 .home page .back Tutorials. Airliners
| Important! To Read! those tutorials about the night VFR and IFR ratings, and about flying the airliners are not as accurate and reliable than those dedicated to the VFR flights. It's because we really practised the VFR flights, as we didn't ever qualify for the night VFR and the IFR ratings nor any commercial license! Our tutorials about such flights are based on our VFR experience only, and augmented with data and readings taken from the Internet! People who would like to find in those the same level of accuracy and details than in our VFR tutorials, should better turn to further websites or source. People who are just looking for a honest level of realism might be satisfied already with the level of our tutorials about the night VFR, IFR flights, and the ones aboard an airliner |
Note! That tutorial is published encours as the section about ssing the Garmin GPS 500 for approaches is not completed yet!
Default FSX airliners, although not featured with a FMC, that on-board computer pilots use during the flight to set the plane, are equipped with the Garmin GPS 500. That GPS, although not offering much of the functions of a FMC, can however be usefully used (depending on the user's needs). Here below, you will find basic instructions for that panel. By displaying, via Options, Settings, Display, Plane, Display Cockpit Tips of the cockpit, you can usefully, in order to better control the GPS, have the function of a GPS element displayed through hovering your mouse over)
Let's start with general views about the GPS:
Pushing the CLR button several times allows to unclutter the map. Pushing CLR, in that order, decides all the details, no class B or C airspace, no navaid, no airport (with indications -1, -2 or -3 next to the zoom value), respectively
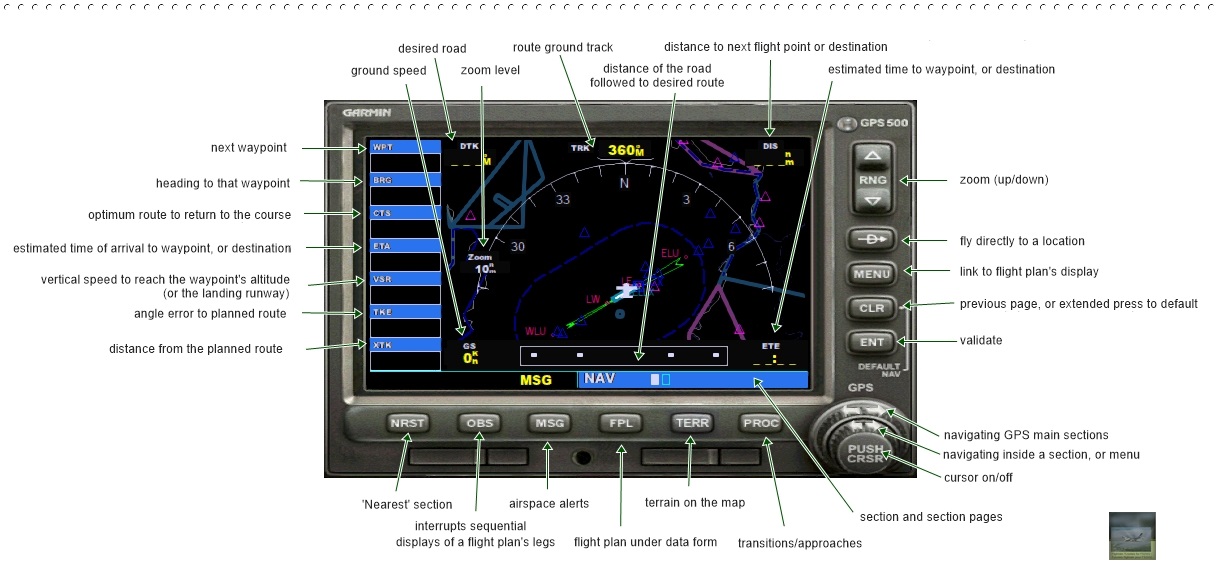 | click on the picture to a view of the basic controls for the FSX Garmin GPS 500 |
Although the Garmin GPS 500 is not a FMC, it does have some features of it however. To link the GPS to a declared IFR flight, just, when switching to the autopilot (AP) mode, to pair it with the plane. The NAV/GPS switch is switched to GPS and one activates VOR LOC at the AP, instead of HEADING, which gives a LNAV (lateral navigation in heading) function of sort. The AP before that could be assimilated to a VNAV (vertical navigation, in altitude) function. On the GPS, the big button bottom left will allow navigating from one data group to the other: NAV (flight plan, map), WPT (airport data, navaids, etc.), and NRST (airports, intersections, navaids, etc. and data, in terms of position, related to a airport). The smallest button, as embedded in the previous one, allows you to navigate within each of these datasets. To navigate through a data set, activate the cursor (PUSH CRSR) and then use the big button at the bottom left to navigate, and ENT to validate (with PUSH CRSR to end the highlight). Idem in the case of a scroll bar on the right of the data. The CLR button can delete some data or cancel a entry. Here follow a few more details about each dataset:
As far as airspace warnings are concerned, which appear automatically, just click the MSG button to make them disappear (you can even turn off warnings by holding the MSG button for two second as 'OFF' is displayed; to re-enable press the MSG button again)
As far as planes equipped with the Garmin GPS 500 and not featuring a FMC are concerned, the use of GPS is almost mandatory if one wants to fly a approach in an automated way. FSX's ATC is most of the time unclear as to orders for descent and interception of a approach -- which already was the case long before that version of the Flight Simulator franchise. Practice proves that, as soon as you receive the ATC message asking you to start your descent from your flight level -- and possibly noting the approach and/or the runway it ascribes -- it is better to request the deactivation of the IFR flight, to confirm that, and to request flight tracking from the current ATC. You will have calculated upstream from that point, the starting point of your descent (TOD, 'top of descent'). On a other hand, you might also deactivate the IFR flight function of the latter like, for example, since the point when you will prepare the plane for TOD and the descent
Let's now transition to the use of transitions and approaches during a given flight. According to the usual practice, you will prepare your flight and your plane. At a point into the preparation, you will check, throuh a site like METAR-TAF, for example, what the weather is forecast at your terrain of destination and you will also check for the terrain data -at least with the FSX chart- and you will deduce what the runway(s) in service is. With such data, you will incorporate at that point of the flight and plane preparation, to check with the GPS, the transitions (about STARs) and approaches available for the runway(s). You will also possibly have added a published chart of available STARs for the terrain and runways, function of what you will have been able to found on the Internet. Of note is that the Garmin 500 does not necessarily include those published transitions into and you will probably have to make your choice differently, like checking the transitions proposed by the GPS. For a given runway, transitions generally are deviced function of the heading whence you arrive, North, East, South or West for example. Juste choose according to your flight plan. Should any transition in the GPS, in any case, no please you or should really not match any published STAR, a radical fix would be just to insert your STAR, through the Flight Organizer, like waypoints of your flightplan. At arrival, you will just have to fly those in altitudes only, and the GPS will keep flying the plane in headings. To check the transitions and approaches in the GPS, you will use the Approach page of the WPT section. Thus, with the big button, choose WPT and, in WPT, make the cursor appear with PUSH CRSR. Display the destination airfield code (small button to select and set the first element of the code, big button to move to the next item and small button to display the desired part of the element). Then ENT to validate. Again PUSH CRSR to remove the cursor (highlight), and again PUSH CRSR to bring it back, use the big button to reach to approaches, small button to navigate in the menu, and PUSH CRSR to stop the cursor. The zoom allows -- badly -- to detail the approaches. You will then note your chosen transition and approach. Thence just keep to prepare the plane, and start your flight according to the usual procedures. When you will trigger GPS at the NAV/GPS switch, the GPS and AP will fly the plane (on its headings only as the altitude control will rest on the pilots!). You will eventually reach to the point where, at a given distance from your destination, you will have to prepare the plane for descending from your flight level down to the transition or STAR. Among those preparations, you will have then just to enter the GPS the transition and approach you will have chosen previously (or others function, for example, of a new weather). Just use, now, the PROC button then Select Approach?. Navigating in the menu is done like already described above. Once your transition and approach chosen -- at Load? or Activate? choose Load? as the data are loaded but not activated -- they will be displayed into the PROC panel. It seems best to avoid a vectored transition ('Vectors') as such transitions mostly brings you to the approach but too much directly and too short; better to choose the other transitions. Then you will reach, on your flight, TOD, that point whence you begin your descent. As you will have deactivated the IFR following of your flight, you will however keep contact with the ATC as different ones will succede themselves. Of note that, down to landing, controllers will not now give you any heading and the plane will just fly along the last waypoints established in your flight plan. Once approaching the first point of the transition, as the latter is figured like a white line in the GPS, go back into PROC and chose Activate, to activate your chosen transition. Thence, the GPS will bring you down to the approach and landing as it will trigger VOR/LOC. The ATCs will keep succeding themselves and nor will they give you your headings, nor -- which turns important during the transition and approach -- your altitudes. You will have thus to set realistic ones by yourself, or using a published STAR and approach
As far as missed approaches are concerned, the Garmin 500 incorporate those into approaches as they may, or not, match published ones. When your plane will pass over the missed approach point (MAP), the GPS will automatically turn to the first point of the Missed Approach procedure and will bring you to a waiting pattern or the last point of the procedure. Thence, to start the transition and approach again, use PROC and Activate?
Website Manager: G. Guichard, site Lessons In Microsoft Flight Simulator / Leçons de vol pour les Flight Simulator de Microsoft, http://flightlessons.6te.net.htm. Page Editor: G. Guichard. last edited: 12/6/2017. contact us at ggwebsites@outlook.com