 .home page .back Tutorials. General Tutorials
Airport Design Editor is a freeware FSX scenery creator. It allows to create airports and terrains from scratch, or to bring changes to FSX defaults! It's that latter function which interests us here. Like a flightsim site stressing realism in flight, that's of interest. The idea of that tutorial came as we flew a Boeing 737-200 to/and from miscellaneous airports located mostly in Europe. Airport Design Editor allows to swift changes to FSX default airports like the texturing of runways, aprons and taxiways. It's out of that tutorial's scope to add newest areas which were built to those airports since the FSX release as that is a more tiedous work. On the other hand be well aware that the work you can achieve like described in that tutorial is not effortless neither. You will need some time and be acurate! Once a first airport modified, you should be trained. The main purpose of that tutorial is to show you how one can swiftly render a airport more realistic. That is in accordance, generally, with my philosophy regarding the freewares I device, which is that they blend into the default FSX. First, just get the ADE freeware and a other one which will prove useful. As far as ADE is concerned, the most obvious source is simply the ScruffyDuck Software where all you need is available. For more comfort, think to download the latest manual also! The second freeware you need is called DXTBmp as it is of use to edit some terrain-related textures. You will find it easily at the MW Graphics site. Also you will have to use a freeware image editor. Something like Photoscape, or GIMP are good tools as you will also the Paint software with comes with Windows editions. Thence, just install those softwares on your PC. The last too is just a browser which allow you to Google Maps, that Google site which provides for satellite views worldwide. Generally, it is more updated than the views found with the Windows 10's Map software. Bing Maps, on the other hand -- search using those words in a search engine -- is maybe more accurate still
Before any change brought to a airport, be warned that some work with default FSX aprons and taxiways, or even runways textures is usually needed. Modifying a default airport to a better match to reality is often not achievable by just swapping textures. The first additional better idea is to download replacement textures. The FSX Airport Ground Texture Upgrade set by Gamalier Padilla is a good match as it will also provide with weathered taxi marks or a general improvent of the terrain granularity in FSX (via the detail1.bmp file found at C:\Program Files (x86)\Microsoft Games\Microsoft Flight Simulator X\Scenery\World\Texture MAKE A BACKUP OF THE ORIGINAL FILE BEFORE ANY CHANGE! Thence even those textures usually need some transformation. Generally, I just modify, at C:\Program Files (x86)\Microsoft Games\Microsoft Flight Simulator X\Texture the following: taxi_asphalt, taxi_concrete, I use a copy taxi_asphalt like a replacement to taxi_bituminous and I also modify runway12. CAUTION! MAKE A BACKUP COPY OF THOSE FILES BEFORE ANY WORK UNTO! something like taxi_asphaltORI, for taxi_asphalt, for example. The general sense of that work will be to get textures hues like the one illustrated below.
 Textures Hues Like a Target (non-clickable illustration) |
Thence, you may start to adapt a or more terrains to your need. We will take like a example, the modification to more realism of a default FSX airport, say Nice, France aiport, LFMN. Before any work with the terrain, the first thing is to gather some reliable data about that terrain, mostly data about the runways, aprons, and taxiways surface. That's most easily done using the 'e-AIP' site for the airport's country, that part of most countries' aeronautical agency which allows pilots and flightsimmers to get IFR flight data. Generally search for e-AIP plus the country's name in a search engine and that will help. Of note that some agencies will ask you to register to gain access. In there, you will find a text document about the airport you want, like, in our example LFMN. Write down those surface data. Now just fire Google Maps in your browser and type LFMN, Nice in the search form. That will send a image of LFMN. Check Satellite view and that displays a zoomable, aerial view of LFMN! Now launch Airport Design Editor (for first launch you will have to complete some preference and paths) and through the File menu, Open Stock Airport, search for the LFMN airport which will display. Before any work, you may also launch FSX and check how default LFMN is displaying into (checking what obvious differences are seen, for example compared to the aerial view). Thence you just have to use ADE to made the appropriate changes. After that just click File/Save Airport then File/Compile Airport as the default FSX terrain will not be affected. With ADE, mostly, you will have to change runways, aprons and taxiways texture. That's done easily through left-cliking on the element/Edit Object, or even double left-clicking on the element wanted. Just passing the cursor unto a element displays its values. In the Properties tab which opens mostly Surface is of interest. Once changed, just click OK. A other useful tool is the Lists menu where you can display all runways, aprons, taxiways ('Taxi Links') with their properties and change those from there. In terms of taxi links, the ![]() button is of use as once clicked at a certain position of a taxiway, it will split it allowing for adjustment in some cases. Also of interest are the polygons existing at a given airport as they mostly determine the surface of aprons. Once you click unto the surface the polygon limits appear like a orange line, with points. To modify the limits of a polygon, should you want, for example, clear a area to draw you own polygon you can either delete some points of the polygon to adjust to what you want, or, which is often the case, to just clear one area into (like when a concrete apron, is surrounded by a asphalt one); in the latter case, it's just a question of adding some points to adjust the area. Adding points is made by CTRL-left cliking on the orange line. The tool
button is of use as once clicked at a certain position of a taxiway, it will split it allowing for adjustment in some cases. Also of interest are the polygons existing at a given airport as they mostly determine the surface of aprons. Once you click unto the surface the polygon limits appear like a orange line, with points. To modify the limits of a polygon, should you want, for example, clear a area to draw you own polygon you can either delete some points of the polygon to adjust to what you want, or, which is often the case, to just clear one area into (like when a concrete apron, is surrounded by a asphalt one); in the latter case, it's just a question of adding some points to adjust the area. Adding points is made by CTRL-left cliking on the orange line. The tool ![]() is also of use as it allows to determine reference. Once a area cleared, just add a new polygon of your choice, using the
is also of use as it allows to determine reference. Once a area cleared, just add a new polygon of your choice, using the ![]() tool and choosing the texture you want. The polygon-drawing tool work by clicking-pulling and by then end just double click and the textured polygon is done!
tool and choosing the texture you want. The polygon-drawing tool work by clicking-pulling and by then end just double click and the textured polygon is done!
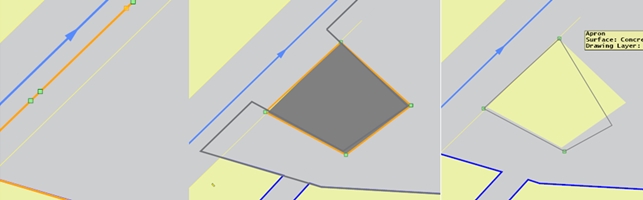 Amenaging a Existing Polygon to Allow a New One (non-clickable illustration) |
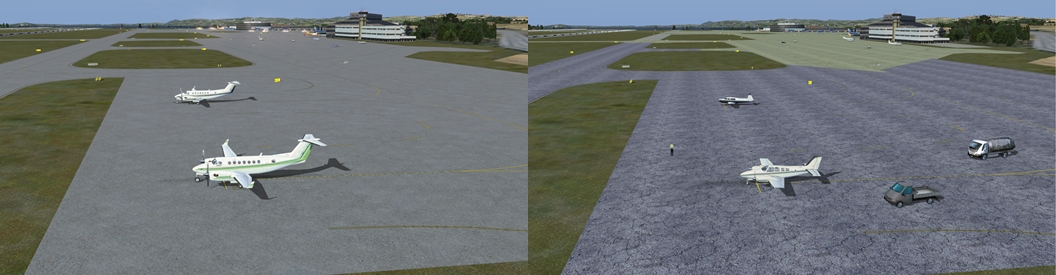 Default FSX LMNC (left), Modified LMNC (right) (non-clickable illustration) |
Now, a last passage dedicated to the FSX file library! The FSX File Library is found through the Environment menu. That's there that you will manage any additional scenery. For the LFMN bgl you have compiled, just create a folder named LFMN and two folders into, one name scenery and the other texture. Move your LFMN bgl into scenery and move the LFMN folder at C:\Program Files (x86)\Microsoft Games\Microsoft Flight Simulator X\Addon Scenery. Now, currently, and despite any other instructions of use provided in the FSX help, a only process works to such a scenery addition: open FSX File Library. Right, click on Add a Scenery. A file menu is displayed. Click on Addon Scenery. In there you are to find the LFMN folder. Highlight it with the mouse without any click. Click Open. And in that display click anywhere in the blank area. The FSX Library acknowledges the addition. Click OK as FSX will rebuild the sceneries data and reload any current flight. Go to Nice, LFMN now and your mods are to appear! Just check how you like the changes or what you might have forgotten. Fix that. And now, you have a more realistic LFMN airport!
->Also of USE, FS Earth Tiles!
A additional and useful tool to improve a terrain, is the famed FS Earth Tiles. That is a clever freeware which allows to create photoreal sceneries working in FSX. It is downloadable at http://www.f-bmpl.com/index.php/faites-le-vous-meme/209-2-installation-de-fsearthtiles-1-3 (note: that's a French-speaking site; click at LIEN DE SECOURS. note2! that's a .rar file, which will need a free .rar unzipper like InstallRARFileOpenKnife). Also download a alternate FSEarthTiles.ini file for FS Earth Tiles at https://1drv.ms/u/s!Av7euqX9-qNYiJZV6FifunXaO4EBYQ. Once done, install the FSTE folder in C:\Program Files (x86) and put the alternate FSEarthTiles.ini into, AFTER HAVING BACKED UP the original! Further, just open FSEarthTiles.ini with a simple text editor like Notepad of Windows and at 'WorkingFolder' etc. replace by:
WorkingFolder = C:\FSEt_WORK #working space folder ori C:\Users\micha\Documents\FSEarth Work .
SceneryFolder = C:\FSEt_scene #scenery folder ori C:\Program Files (x86)\Steam\steamapps\common\FSX\Addon Scenery\FSEarthTiles
That grammar, on the other hand, preserve the original adresses. Of note that FS Earth Tiles is deviced to work with, among others, either the Virtual Earth data -- which are those of Microsoft Bing -- or Google Maps data. In order that the Google server works, just replace, in the FSEarthTiles.ini file, at [Service2]/ServiceUrl =, https://khm0.google.com/kh?t=t%s&n=404&v=158 by https://khm0.google.com/kh?t=t%s&n=404&v=802 . Thence both the Virtual Earth and the Google Maps servers allow to vary available data
. Thence, go into you C:\ hard drive and, in there, just create those two folders: one named FSEt_WORK, one name FSEt_scene. That usually allows FSET to work. At last, of importance is also tuning settings of the FSEarthTiles.ini file related to Brightness and Contrast, which allow to tweak with how the textures yielded by FSET will render. The default values I use are +12.0 and +29.0 respectively as thence you can find the best for yourself. Further each airport or location may require specific settings like for terrain in Europe, deserts, mountains, and from Virtual Earth or Google, or other servers, etc. After that just launch FSET. The use is straightforward! Zoom, top right of the image, allows to widen or shorten the area allowing to journey to the area of interest (zoom close then). Draw, above -- left-click -- allows to determine the area of interest. Download Resolution, left of the image, is usually set to 2,3 which will not yield to much a weighing file but retaining quality. Once done, hit Start and FS Earth Tiles will just begin to compile the area you chose into a bgl useable with FSX. When done, check at your C:\FSEt_scene where the photoreal is found in scenery and a texture in texture (as that latter one is to use with FS2004 only). Put that in the appropriate folders in the FSX Scenery Library. That's it. Under a default, or customized terrain, that photoreal texture will appear, and variable according to seasons too. About that point, to be able to have in FSX, both a winter texture without snow for when FSX displays that like that, or a winter texture with snow, you will have to create twice the same photorealist scenery. For the first case, you will modify the FSET FSEarthTiles.ini file, at CreateWinterBitmap = Yes and at CreateHardWinterBitmap = No; and for the second, the reverse. Usually some adjustment is needed, with a software like ADE, to match the terrain to the texture. Note that FS Earth Tiles is deviced to work with Google Maps data too but that seems to not work anymore. Just the Virtual Earth data are collected, which are Microsoft Bing ones. As those are slightly less updated than those of Google, some more adjustments may be needed. In case of disagreement about a taxiway texture or placement, for example, between the photoreal scenery and the terrain's data, trust Google Maps data better than Bing's. Once done, you get a fine terrain underlined with photoreal data!
NOTE! YOU MAY ONLY USE scenery created with FS Earth Tiles through Virtual Earth -- and Google Maps likely -- data, for a personal and non-commercial use as the use for a freeware creation may be debated and needing a specific authorization by Microsoft! Maybe those limits might concern the download into FSET of large sceneries and not the background to one terrain solely
