 .home page .back Tutorials. GA Planes
Some more hints and miscellanea useful to the private pilots. Albeit the VFR pilots mostly fly using ground landmarks, they however have to master the basics of the radionav aid (the VORs, NDBs, etc), those radio aids mostly used by the IFR pilots. Some advanced pilotage is required too to get better inserted into the aiport environment as, at last, the private pilots are trained too to control the plane -or to regain control of she- in some cases of emergencies
|
. The Radionav Aids (VORs, NDBs, etc) . Advanced Pilotage . Emergencies |
Even if flying a VFR flight mostly relies on the ground landmarks, the VFR pilots are occasionally brought (or in case of night VFR) to use radionav aids. Those aids, like the VORs, the NDBs, the VOR-DMEs, etc. are ground radioelectric systems which allow the pilots to know where the navaid is located, through an onboard receptor. The location and freqencies of the navaids are found on the aeronautical charts (VFR charts, airport areas charts, etc.)![]()
|
- The NDBs - The VORs and VOR-DMEs |
Nondirectional radio beacon or NDBs are older radionavigation aids. Their radio emission in the low or medium frequency band of 200 to 415 kHz allow to locate where one's plane is relative to them. NDBs are mostly used per se or like associated to a instrument landing system (compass locator). With compass locators and a range of 15 NM, NDBs come into three types, MH, H, HH with a range of 25, 50 and 75 NM respectively. Like VORs NDBs benefit of a identification Morse code. NDBs may be subject to to electrical disturbances, such as lightning and interference from distant stations. The basic equipment of a plane to use a NDB is a 'Automatic Direction Finder' or ADF. A ADF features a navigational display. The navigational display consists of a dial upon which the azimuth is printed, and a needle which rotates around the dial and points to the station to which the receiver is tuned. 0° is representing the nose of the aircraft, and 180° representing the tail Some of the ADF dials can be rotated. Keep in mind that the needle of fixed azimuth points to the station in relation to the nose of the aircraft. If the needle is deflected 30° to the left, this means that the station is located 30° left and conversely. If the aircraft is turned from the azimuth value, the needle moves to indicate a relative bearing of 0°, or the aircraft is pointing toward the station. When a pilot flies toward the station keeping the needle on 0°, the procedure is called 'homing to the station'. In case of a correction for wind drift is applied, the ADF needle indicates the amount of correction on a side or a other. In VFR conditions, NDBs are mostly of use to determine a position and a heading in case of emergency, when caught into weather for example
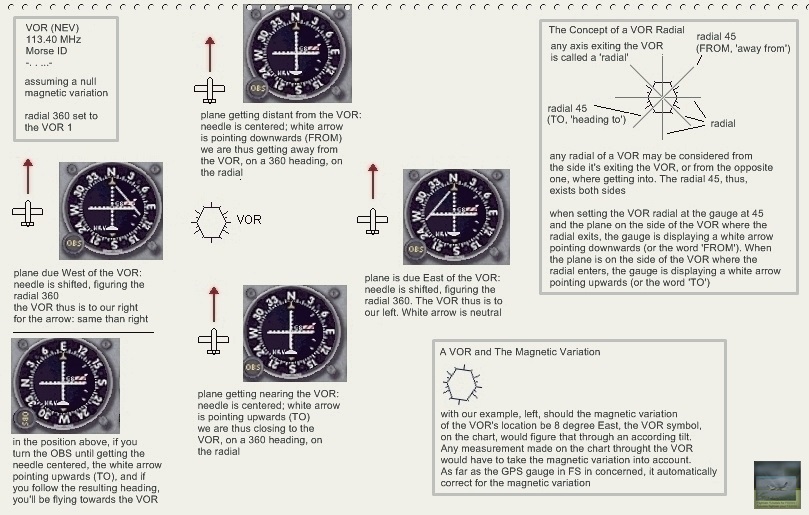
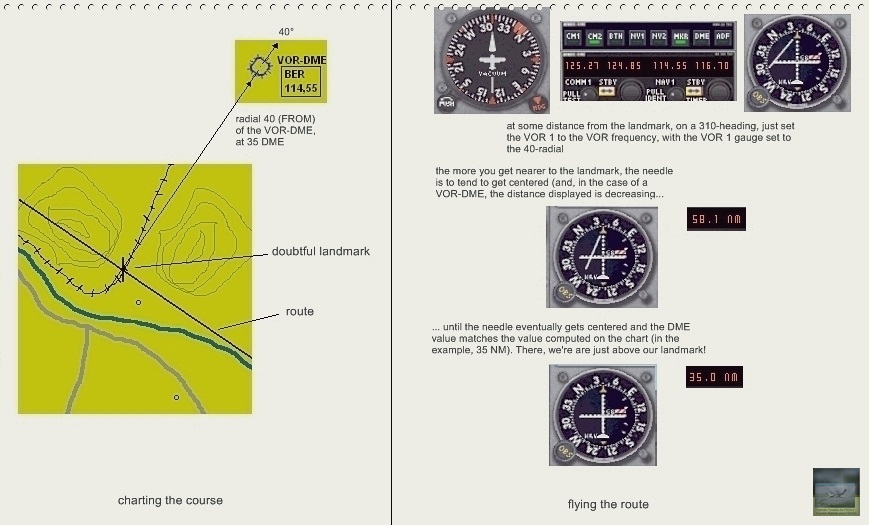
Like the name, a VOR or 'Very High Frequency Omnidirectional Range' is a ground-located radionavigation aid which emits a full circle around it, in all directions or in the axis of each of the degrees which constitute that circle. Each axis is called a 'radial' as each radial is the line of emission which leaves the VOR outbound. Radial 45, for example, is the emission line which, from the VOR, runs to a 45 degree magnetic heading. A VOR is identifiable, from the plane's receptor, through its Morse code identification or, in some cases, a vocal signal. VORs, on aeronautical charts are represented aligned to the magnetic North and not the geographic one. That allows to measure their values directly from the chart in headings corrected from the magnetic variation of the area as the difference between the North of the VOR and the geographic North allows to confirms the value of the magnetic variation. If, for example, the VOR's North is inclined towards the East and displays a 5-degree difference with the vertical -or the geographic North- the area's magnetic variation equals 5° East. VORs mostly come into three varieties like the VORs (most simple of them), the VOR-DMEs (a VOR with a distance determination system or DME, 'Distance measuring equipment') and VORTACs (military VORs mostly found at air bases, with a tactical navigation system or TACAN, 'tactical air navigation.' Another classification of VORs is the one which sorts them into High Altitude (with a range up to 130 NM), Low Altitude (with a range of 40 NM), and Terminal ones (with a range of 25 NM and linked to a airport terminal area). A VOR allows to localize where one's plane is or to follow a route and heading through a radial. At the effect of using a VOR, a plane is equipped with a VOR receptor which allows to visualize any of the radials of the VOR. Such receptors come into three types, function of the degree of complexity of a plane. GA planes a VOR receptor comes with its simplest form, or a 'Course Deviation Indicator,' CDI. Advanced planes come with a 'Horizontal Situation Indicator,' HSI or a VOR receptor coupled to a Heading Indicator, or with a 'Radio Magnetic Indicator,' RMI which comes like a complement. A RMI links a VOR to a ADF, another, older radionavigation aid. How a simple VOR receptor works is easy. Just set the VOR's frequency on the plane's radio panel appropriate window and check the ident of the VOR through its Morse code. Turn the VOR gauge mobile dial, or OBS, you will see the VOR's needle get aligned as the gauge also displays the 'TO' indicator (or a arrow pointed upwards; 'TO' stands for 'towards (the VOR)'). The VOR value which is then read on the gauge is the one of a radial. Such that move allows first to know where your plane is located relative to the VOR. If the aligned needle shows the 45-degree radial and TO, that means that you are located somewhere southwest of the VOR. That tuning also allows to follow a heading leading to the VOR as you just have to follow a heading equal to the radial, or a 45-degree heading. Your plane then will fly towards the VOR, which is a safe way to follow a course. If, when overflying the VOR, you keep flying that 45° course, the TO indicator will swing to 'FROM (or a arrow pointed downwards; 'FROM' stands for 'from (the VOR)'), meaning that you just passed vertically over the VOR. You know are still flying along the 45 radial but we are getting distant from the VOR instead. To fly to a VOR, it is always better to dial a inwards radial of it, which is a radial allowing to the TO indicator. VORs, on a other hand, as far as VFR flight is concerned, are not used the way we just described, which is the way to be used for IFR flights, where a pilot is flying along routes as determined through radionav aids. In VFR, the use of a VOR must be limited to a help to safely determine a visual landmark which otherwise would be dubbious. If, for example, when charting a course, a landmark looks like it will be hard to safely determine, like a crossroad which may be confounded with a other one, you just will determine a VOR and a radial which comes along the landmark. In flight you will thus spot the landmark both visually and with the help of the VOR. The aligned needle of the chosen radial will confirm that you are overflying that landmark. Better still if you use a VOR-DME as the landmark will be defined with a distance too. Another use of a VOR for a VFR flight is that pilots often know on what radial of a given VOR their usual terrain is (and sometimes too with a DME distance). That allows, for example, after a training flight during which your maneuvers could have disorient you in terms of where your plane is, to easily found your terrain back through intercepting and following that radial
 |  |
| click on the picture to a view of how a VOR is used | click on the picture to a view of how to use a VOR to confirm a ground landmark during a VFR flight |
When a pilot is flying an airport traffic pattern around an averagely large terrain, with relatively much planes on the pattern, the air traffic control, which will have commanded you to use the pattern, will maybe ask to you to fly a 360 degree turn at the purpose of to regulate the planes aiming to land, from the traffic pattern. Or, as you'll be on a final to the runway, the plane which landed before you, maybe will not have vacuated the runway, bringing to that you'll decide -or be ordered- to go-around. Let's see that! (note: there are no specific checklists for those maneuvers, and the pilots will have to know them by heart; along one year, just force you to train twice of thrice for those)![]()
|
- Waiting in the Pattern - Go-Around |
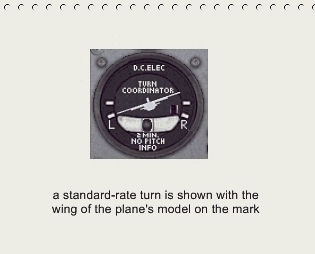 | click on the picture to a view of the turn at a standard rate |
Such a maneuver is meant to make you late on the traffic pattern, so the controllers will be able to regulate the planes on there. You'll just to turn level, during 360 degrees, at a speed of 90 kts, beginning where the air control will have ordered that to you. Most of the cases, you'll not have configured the plane for landing, in the downwind leg, already. The important point for that maneuver is the question of the 'turn at a standard rate'. The 360-degree turn you'll perform will have to be flown at a standard rate, using the turn indicator and coordinator on the panel. Just keep the plane symbol's wing inclined to the mark marked left (L) or right (R). The turn at a standard rate allows the controllers to know, function of the plane you're flying and of the speed at which you're flying, what time you'll need to perform the turn, allowing them to regulate the planes circulation on the traffic pattern. At the end of such a first turn, the tower might ask you another, until they tell you that you're cleared for the pattern back. Just begin your downwind leg then, after having turned 360 degrees, leaving from the downwind leg, at a standard rate of turn, relative to the downwind heading
It may occur, when you're on a final, that the tower -or yourself deeming it necessary- commands you to go-around. A go-around is when you're obliged to apply the throttles back, and to go-around (mostly for a new traffic pattern in most of the cases). The procedure is called too a 'rejected take off'. This will be caused mostly by a plane, having landed ahead of you, and which will not have vacuated the runway in due time. You MUST too to make a go-around when your final has been faulty and that you see that you'll miss your landing and that the latter risks to be dangerous. A final may be too high, too low, or too slow. When you'll have to decide by yourself (in the case of a landing at an uncontrolled terrain), YOU HAVE NO margin! Should there be a plane on the runway, should you deem your final faulty, YOU MUST go-around! Should you deem your final faulty as you're approaching the runway under the supervision of a tower, you'll have to ask the controller the permission to go-around (bringing to that, by the way, you'll have to take the decision early), or -should you have reached to low and near the threshold- just go-around, and radioe after. How do you do a go-around? YOU JUST don't land! Just pull the yoke, throttle full back, fly level for some time. Once the plane have accelerated enough, just get 2 notches of flaps out (thus back to a take off configuration -one notch) and, like for a usual take off, once the plane, then, accelerated up to the climb speed, just take the climb pitch. Then, just ask the tower, in the case of a controlled terrain, what you have to do. The tower usually will order you another traffic pattern, or they will give you a heading, altitude, a call at such waypoint, etc.)
When you'll train for those both maneuvers, just ask the authorization to do so to a controller, in case of a controlled airspace
Here is a delicate part of the training of a VFR pilot. A plane, generally, as far as her mechanical state is concerned, is checked and maintained regularly. Hence a failure in VFR is mostly rare. A failure may occur however! A second occurrence is more likely to occur, when a maneuver putting an important workload unto the pilot, brings to that the pilot's awareness is sliding and that he lets the plane to reach a dangerous flight attitude. Another case will be evoked too. In all those cases, the GA pilots are trained to control the plane, or to regain control of she!![]()
|
- Engine Failures - Dangerous Flight Situations - Performing a 45 Degree-Banked Turn to get Out of a Cloud, or a Weather Front |
Every trained GA pilot knows how to handle a failure in four cases: an engine failure during flight, an engine failure after lift-off and an engine failure in an approach
The aerodynamical forces are such that, in some phases of a flight which necessitate a hard workload by the pilot, some moments of unawareness only may lead your plane into a dangerous situation. Just react immediately to regain control! Else, the situation would just worsen and bring to a grave accident
It may occur that, when performing a VFR flight, the weather deteriorates and that a weather front forbids you to go any further. What to do. First, just act quickly! You have NO OTHER CHOICE than to make a 180-degree turn, as, as a VFR pilot, you'll fall into IFR conditions. So, once you assessed that the weather front blocks your route and forbids any safe flight further, JUST perform a 180-degree turn to take the opposite route of the one you were following. Thus, should you have been to a 355° heading, just make a 180-degree turn to a 175° one! That turn, FURTHER, is to be performed quickly! Hence the turn will have to be performed at an important bank. 45°! On the attitude indicator, a bank of 45° is spotted through the lowest white draw in the lower part of the gauge. Well: having noted the heading at which you were flying, just bank the plane visually (visual clue horizon-panel) AND with the attitude indicator (the 45° mark), and you turn. A steep turn will need that you pull the yoke strongly enough, during the turn to prevent any altitude loss. AND you'll just keep the 45° bank (at the attitude indicator only now) until the 180-degree turn is completed! You just then stops the turn -and note how to get out of a highly banked turn needs some more time than to get out of an usual turn; anticipate- and you're back to the opposite of your route! A 45°-banked turn is, in a sense, a first experience of a flight with the instruments only. You may train for the 45 degree-banked turn anyway, at a sufficient altitude and after having got ascertained that you can train safely!
Website Manager: G. Guichard, site Lessons In Microsoft Flight Simulator / Leçons de vol pour les Flight Simulator de Microsoft, http://flightlessons.6te.net.htm. Page Editor: G. Guichard. last edited: 5/27/2013. contact us at ggwebsites@outlook.com