 .home page .back Tutorials. GA Planes
The basic controls needed for a plane as it's flying are the level flight, the climbs or descents, and the turns. Once such basic controls acquired, you'll certainly will enjoy your flight simulation experience better! The following exercises will use a Cessna 172SP -a plane which you would use in the real world to get trained to fly. When available, just use the 'Y' command and raise the plane at an altitude of 5,000 ft relatively to the ground. Let's get it on a stabilized flight at that altitude, using the autopilot: let's set the altitude at 5,000 ft, a heading -at will- and once the plane level, let's tune the throttle to get 2,400 rpm at the tachometer, some mixture off, and tune back to 2,400 rpm. Trim tab set at neutral (medium position). We'll successively practice a level flight, a climb and a descent, and a turn! You'll take note of that the yoke, in a Cessna 172SSP, is of the type control wheel. In the following text however, we'll used indifferently "control wheel" or "flight stick" at the effect that people who don't have a control wheel -as they pilot the Cessna with a joystick instead- or those who fly a plane commanded by a flight stick, can follow the lesson too (a flight stick is moveable in every direction as a control wheel, in a general aviation plane, may only be inclined left or right, and pulled or pushed. This requiring thus some attention when one transitions from a joystick to a wheel, and accordingly
|
. Level Flight . Climbs, Descents . Turns |
To fly level means that the plane is flying horizontally and that the pilot will maintain it so. How to do that? Through the control wheel, through a visual clue, and through the trim tab. The control wheel is for compensating any discrepancy relative to the horizontal; just use it enough to compensate, not more. Now: how do we know we're flying level? The main thing to catch is that flying a GA plane is mainly flying visually (only the pilot having got their IFR -'Instrument Flight Rule'- qualification may control a plane throught the instruments only! We, as we fly our GA plane, are mostly VFR -'Visual Flight Rule'- meaning that we need to always have a sufficient view of our surroundings). Let's see that. We're now in our plane, leveled at 5,000 ft and controled by the autopilot. Let's now understand that well: in the 2D or 3D panel mode, you'll see that the horizon -the landscape- is a perfect visual clue relative to the top of the plane's panel! You see, that is, that the horizon seems to be at such apparent height above the panel's top. Each time you'll see the horizon with that apparent height, that will mean that you're flying level! This is a piloting basic. When flying a GA plane -except if you're qualified IFR- YOU FIRST FLY VISUALLY! You will, of course, adapt the visual clue to how your setting your virtual height inside the cabin. Once that visual reference got, just memorize it. Our plane, further, has instruments too, in any case, which show which is the plane's attitude and situation of flight (see the tutorial "General presentation of a GA Plane"). Hence, once the visual clue ascertained, we'll be able to confront it to two of the instruments -the attitude indicator, and the vertical speed indicator-, confirming we are in a level flight. Simple! The attitude indicator's plane symbol is figuring the plane as the blue/black division is the horizon. The "wings" of the plane symbol have to be "on" the horizon to mean that the plane is level. The vertical speed indicator (VSI) is measuring at what rate -in ft/minute- the plane is climbing, or descending. It will have to be at zero, indicating that the plane isn't climbing, nor descending. Well! Let's summarize a little bit: the pilot will have to maintain the plane on a level flight through the yoke, USING the visual clue of the horizon relative to the panel's top, AS he further will check that clue with two of the plane's instruments -the attitude indicator and the VSI, with the plane symbol's wings on the horizon, and the vertical speed on zero. Just get that well -with remembering what the angle horizon-panel's top has to be- and let's practice! Just turn the autopilot off. You're now in control of the plane. Just have the plane descend slightly by pushing the yoke (you'll note that the angle horizon-panel has increased). Let's pull the yoke back to have the plane level now (at whatever altitude you may have attained). Once done, just take a swift look at the attitude indicator (the 'wings' are level on the horizon) and the VSI (it's indicating zero). Note: don't try to a high-precision flying! Such a precision is required from the IFR piloting only. Just have your plane level, mostly. Now the trim. Since you read the tutorial "General presentation of a GA Plane", you know that the trim tabs are small controls added to the primary controls and which allow to fine-tune controling the plane. As far as level flight is concerned, we'll use the trim tab for the elevator. When you bring the plane back to level, you'll have noted that the air flux will have a tendency to persist, bringing to that you'll be obliged to maintain some pressure of the yoke forwards, so the plane don't keep climbing. Using the tab trim will just ease that need for pressure: as you'll keep the pressure on the yoke, just activate the trimming. And the plane will slightly pitch down, with the pressure on the yoke relaxing. You are then level flying in the optimal conditions! The technique -bringing the plane level through the yoke/visual clue/checking with the instruments/trim- needs to be mastered well enough as it's used each time that, along a flight, you will bring your plane back to level, from a climb, or a descent
 | click on the picture to a view of the visual clues which allow to place the plane into such or such attitude |
Those are easy maneuvers! You'll just have to use the control wheel, or the flight stick, with pulling back to climb, and pushing forwards to descent. Let's do that first with the autopilot: using the 'Y' command, let's descend the plane at, say, 4,500 ft, and let the autopilot pulling the plane back to 5,000 ft. What's happening? You see how the autopilot places the plane in an attitude of climb (the plane is set into a 'climb attitude') as -important- the angle of the horizon to the panel's top is changing, to less. A look at the instruments (idem: attitude indicator and vertical speed indicator): the wings are above the artificial horizon, as the VSI needle indicates about 500-600 ft/mn as a climb rate. A descent now. Once the plane stabilized back by the autopilot at 5,000 ft, just get it, this time, to, say, 5,500 ft. And let the autopilot brings the plane back to 5,000 ft. It then places the plane in a descent attitude (into a 'descent attitude'). The angle between the horizon and the panel's top is increasing this time, as at the attitude indicator, the wings now are under the white line and the VSI indicating about 500-600 ft/mn. With those two experiments, you just catched that, to control a plane to have it climbing, or descending, you'll have to use the yoke, and to check the plane's pitch through the angle horizon/panel's top. Note that you'll be able too to use the trim tab to alleviate the work at the yoke, when the climb, or descent, will have to be performed on some duration of time. Let's practice now, instead of the autopilot! A climb: some pressure on the yoke backwards, and... bring the horizon to its place relative to the panel. Keep the yoke backwards. And... the plane is climbing! A swift look at the atitude indicator and VSI: wings are under, the VSI is at about 500-600 ft/mn. Get your plane back to 5,000 ft and the autopilot. Now a descent: just the same, as you'll push the yoke forwards this time. Bring the plane to the visual clue of descent. Keep the yoke forwards. And attitude indicator and VSI: wings above, VSI 500-600 ft/mn. You may bring your plane to level: yoke to get the visual clue for level, rapid check of the two instruments, and trim
Turns are of a little bit more complicated. This is due to the aerodynamics of them. A turn is engaged through the ailerons. Both ailerons are moving reciprocally, with when the right aileron lowering, the left one heightening and conversely. The ailerons are actioned through the yoke -the control wheel inclined left or right and a flight stick move laterally left or right. The conjugated motion of the ailerons has as an effect that the plane turns, due to how the air is flowing on both wings is modified. The aileron which is lowering brings that it's wing's lift is increased, as the aileron heightening that it's wing's lift is decreased. The air flux is no more balanced each side of the plane, with a wing having more lift, as the other less... and the plane get inclined on the side with less lift! Easy! The logics of the aerodynamics of the turns gets further with a secondary effect: more lift equals more drag, with the plane slightly braked on the side of the wing getting more lift. Its longitudinal axis hence get drawn on that side, and braked some bit (practically, this means that the plane's nose is deviating towards the side with more lift, at the opposite of the direction of the turn, by the way). This double aerodynamical reality makes that, to make a plane into a turn, one needs to use both the ailerons, and the rudder! This twin action is called 'coordinating' a turn. Hence to turn, you'll have to act on the yoke (controlling the ailerons: left input, left turn, and inversely), and the rudder (to have some input into the turn, to get the nose of the plane there). That twin control MUST BECOME AN AUTOMATISM! EACH TIME, you'll get some input into the yoke in a turn action and/or fashion, you'll need to get a rudder input too in the same direction! ALWAYS! Note: if you don't use a separate rudder with Flight Simulator and have the rudder set to automatic, it's the simulator which will coordinate your turns; in that case, just simulate the action with your feet to get a good custom. More: once in its turn, left or right, the plane will tend to slightly loose some altitude (you'll have to pull the yoke to prevent that) as another visual clue will be needed, for a turn, this time. In terms of the angle of bank, turns may be parted, on a other hand, into shallow, medium, and steep turns, where the bank is less than about 20 degree, between 20 to 45 degree, or 45 degree or more respectively. Shallow turns make that the inherent stability of a plane is leveling the plane by itself as steep turns display a overbanking tendency. Training turns thus should be practiced at a medium bank, the one where aerodynamics make the plane 'naturally' remains at a constant bank. Bank generally is determined through the attitude indicator (AI). Except for some given maneuvers during the PPL training -which will have also to performed in a flight with the same conditions- no special hint is given in terms of what angle of bank is to be used by a pilot in flight, except that a medium bank allows for a greater stability of the plane during the turn. At a given constant airpseed, further, a larger bank angle results into a smaller turn radius as, at a given constant bank angle, a slower airspeed will!
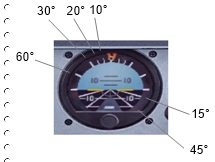 | how the bank angle is displayed on the AI |
Let's go back to the autopilot to get new visual clues about a turn: the plane level at 5,000 ft, decrease the heading by about 120° as the autopilot will put the plane turning left in a shallow bank angle. Check the visual clue (horizon/panel's top). Let the plane back to a horizontal flight. 120° now increasing. Check the visual clue. And like for the level flight, the climbs and descents, one checks the clue with some instruments' indication. On the attitude indicator first: the plane symbol is inclined, with the wing concerned by the turn of the first white draw, in the black portion of the indicator, indicating 15° of bank. On the altimeter, this time, and not at the VSI: the altitude is not decreasing. Back to practice now! We are going to train with medium bank angle turns, about 30 degree! More complicated than previously however: input into the ailerons through the yoke -if a rudder, rudder input into the turn. Controls back to neutral (ailerons, hence rudder too!); the plane's now turning by itself! Check a visual clue. Keeping a back pressure on the yoke to prevent the altitude loss. A swift look on the instruments: about 30 degree at the AI, no altitude loss! Ready? Let's go: we are level at 5,000 ft and we are going to make a left turn. Autopilot off. Yoke left AND rudder left! One gets the plane inclined up to the visual clue AND yoke and rudder back to neutral! Some yoke backwards. The plane is turning by itself. When one gets at the end of the turn, yoke AND rudder to get the plane back to horizontal (visual clue for the level flight) and then yoke AND rudder back to neutral. One relaxes the yoke pressure backwards. Possibly trimming. We're back to horizontal and a level flight. Note: trimming for the elevator may be used during a prolonged turn
Climbing, Descending Turns: during a flight, you may have to, at the same time, turn and climb, or turn and descend. Both those maneuvers are a combination of the maneuvers for a turn, and for a climb or descent. The action begins with the plane put into the turn as the actions for the climb -or the descent- are chained just at the end of that. And one gets out of the turn first, with back to level chained to it. Two supplementary visual clues thus are needed, as the maneuvers are checked too with the instruments: the plane is in a turn as checked on the attitude indicator; it's climbing (or descending) with the vertical speed indicator showing 500-600 ft/mn of rate. In case of a prolonged turn, one may use trimming both for the turn and the climb/or descent -in the first case, of course, only if the plane features trim tabs for the ailerons
Website Manager: G. Guichard, site Lessons In Microsoft Flight Simulator / Leçons de vol pour les Flight Simulator de Microsoft, http://flightlessons.6te.net.htm. Page Editor: G. Guichard. last edited: 5/27/2013. contact us at ggwebsites@outlook.com