 .back
.back
Advances with the FSX Flight Simulator franchise now is allowing to easily chart a course and to close, in terms of realism, to the real world's practice and flight. We have a fine tutorial in French about how to chart a course in FSX: Tracer une navigation dans FSX. It is mostly related to the French technique of the VFR navigation however. Instead thus of having translated that tutorial, we are justing giving some hints to how to use FS to plot a course as the English-speaking, and Anglo-Saxon flying pilots might not be accustomed to the French VFR navigation (which generally however is just a dead reckoning technique allowing for some basic similarities with what is flewn in other countries). Our technique eventually brings, on a same picture useable into FSX, to the varied data like a chart and other documents used on the pilot's kneeboard
The main idea to chart a course with FSX is just to use, first, a VFR chart, or a digital image of a one you will have reconstitute from such sites, for the U.S.A., for example, like Skyvector.com (do not plunder their sites!) That is allowed due to FSX terrain now much closing to what is represented on a VFR chart. Should you use a chart made from excerpts found on online sites, just take the precaution too to build a easy-to-use scale to that chart with the units in NM, for example. A other precaution to that scale will be also to copy-paste that scale and orient it in varied orientations so to be easily able to use it along any pathchosen for the flight (check more with the picture below)
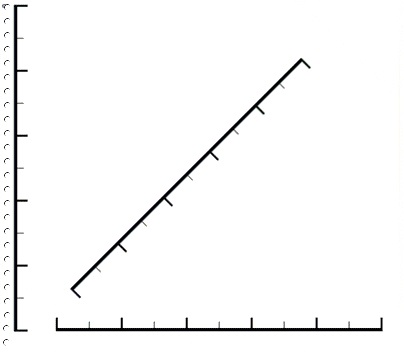 | click on the picture to a view of the different orientations of one scale built to use with a VFR chart |
Then just turn to FSX' Flight Organizer. Chart a course between the two terrains involved with your course and plot a chart and data with the Direct GPS option. The chart plotted by the organizer may be refined should your course include a VFR mandatory path into a controled airspace, for example. You may alter the chart proposed by the FSX appropriate function, which allow for more waypoints, or create as much charts as needed. In the Navigation Notebook in the organizer too, just copy the useful data given herein. FSX Flight Organizer also will choose a flight altitude for the course which mostly looks like it determines it from the altitude of the terrain encountered. We will see hereafter that the pilot will better do to pich its own altitude(s) from the real-world VFR chart function too of the terrain but also for regulatory areas. At that stage, also worry to calculate your plane's ground speed. Miscellaneous source may afford for but a way to get a ascertained speed for the plane you usually fly with is to calculate it yourself: just fly your plane, at a average altitude (in the order of 5,000ft) with the usual cruise setting on a route direct to a VOR/DME with the frequency of it at the radiocoms. Once your flight stabilized at a sufficient distance from the VOR/DME the DME display in the plane will check the ground speed, in knots. That may be considered the 'average' ground speed to be used when charting a course. From that, also compute what distance, in nautical miles (NM) your plane will fly in 10 minutes as the average interval between two landmarks, in a VFR flight, must be about 10 minutes
We now have at disposal the date useful to plot the course! The plane's ground speed, a VFR chart with its scale and date plotted with the FSX Flight Organizer's Navigation Notebook. You will now just draw on the real-world VFR chart the route like defined through the Flight Organizer (with the possible multiple calculations performed function of the regulatory areas, for example). Just draw the course from the center of the first airfield to the center of the arrival one. The FSX Navigation Notebook, on a other hand, has computed the heading(s) for the course. Then, function of the practice in your country, you will just have to plot the landmarks you will use during your dead reckoning flight. For that, as the terrain in FSX now about closely matches the one described on the real-world chart, you will use the scale for your VFR chart, looking for appropriate landmarks -values given for France- about each 10 minutes (should you not find any major landmark at 10 minutes, just look for one somewhat ahead, or after the 10-minute mark. A maximum of 8 and 12 minutes is allowed, respectively). Just use a text file to report the landmarks you will have chosen where you will also write down the heading to fly to the landmark, how long to fly to it, and what they are (a river, railway, etc.) and how long to fly to the landmark. Any additional useable date may also be written down at that stage like, for example, the time before which to call before entering a controled airspace. Once each step of the route plotted, just chose the altitude(s) to which you will have to fly (and add it into each leg), following VFR flight rules. Other data are of interest, like the time of departure, the total estimed time of flight (computed, for example, from the time for each leg, augmented, for the first one of some additional time for flying in the departing airfield environment and for the arriving airfield operations too (flying the pattern, etc.), the estimated time of arrival (ETA). A time for taxiing is also to be taken in account. Flying a VFR flight also usually need you have at disposal the data pertaining to both the departing and arriving airfields (accurate name, altitude, frequencies, runways, pattern, etc.) as such data may be easily found from real-world documents to found on the Internet when possible, or gained from the View of the Chart in FSX. The frequencies of the airspaces encountered are also of use, or one or two VOR which may be used to check some few obvious landmark along the course. The doc to a diverting airfield(s) are also usually taken by a pilot in its kneeboard. The weather now with the ceiling, visibility, winds, pressure, etc. or the possible NOTAMS (which are not easy to find except on the Internet with sites dedicated to charting a course online). All such data are to be formally added to the section of the VFR chart representing your flight's course whence you get a picture file which is close to a real-world kneeboard. To use that picture into FSX kneeboard, just do like the following: the picture file may be saved either in the .jpg of the .gif format; just open with a simple text editor the .check or even .ref html file for the plane you used; immediately after the item 'body,' by the file's beginning, just add that code img src="xxxx.gif", 'xxxx' being the name you will have given to your picture (do not forget square brackets either side of that code, like those found each side of 'body.' Now, during your flight, when using FSX kneeboard you will have your documents for the flight at hand, mostly like in the real-world! We give below a example of such a file (in French only) we are displaying with our French-speaking tutorial
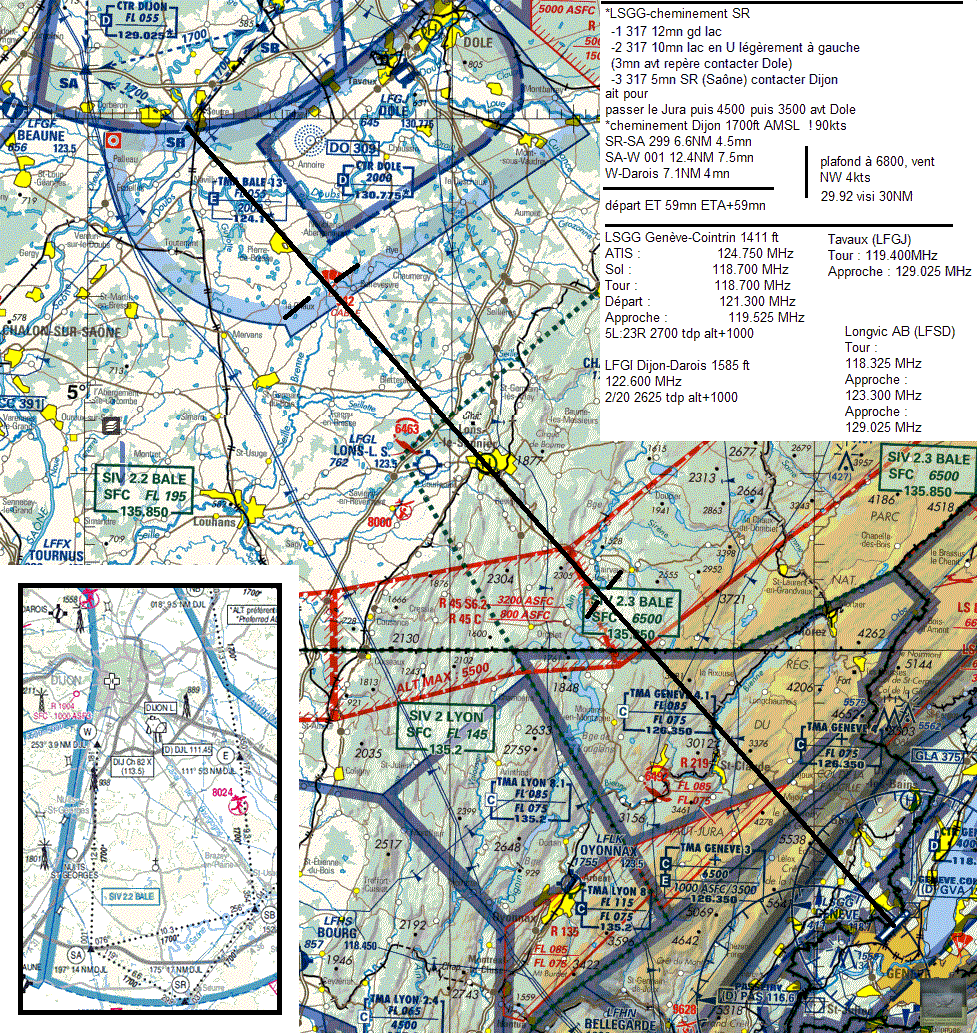 | click on the picture to a view of a VFR chart with doc used to fly a navigation in FSX, closing best to a real-world kneeboard (in French only, from the French usage of VFR) |
