.home page .back Tutorials. GA Planes
 |
A PPL pilot, once his license successfully obtained, is allowed to fly VFR only, by day, with passengers. VFR means that the pilot will always have to keep the sight of ground. To be able to fly by bad weather, or by night, pilots must endure some further training, which will bring them to ratings allowing for those special flights. To get to the night, then the IFR ('Instruments Flight Rules') ratings, a pilot will need some 50 hours more of theoretical training, 30 hours of flight in an official flight simulator, and 55 hours of real flight (for example, they will already have spent 40 hours of flight -and the joined theoretical training- to get their PPL). Another way the pilots have to improve their PPL is to just get in more their night VFR rating, which allows a VFR pilot to fly during the night (that rating, in any case, is usually a mandatory step to the IFR rating). Thus, to fly VFR is mostly to fly by day, and by keeping the ground in sight all along your flight. Specifically, some usual, sky values to be respected for a day, VFR fligh -usually under 10,000 ft only- are the following (with some variations possible according to each country): the pilot shall have an overall, 3 miles (5 km) of visibility. If the flight occurs at the level of the clouds ceiling, the plane will have to always let 2,000 ft (600 m) of distance between the next cloud and sheself. If the flight occurs above the coulds ceiling, the flight altitude always must be superior to the ceiling's altitude by 1,000 ft (300 m), as, if the flight occurs below the ceiling, the altitude difference must be, in that case, of 500 ft (150 m). In such conditions, the visibility, as far as the large airports' aerial space areas are concerned, is to be, there, of a visibility of 3 miles (5 km), as, relative to the clouds, and clouds ceiling, the only obligation then is to stay out of the clouds, only. As far as the VFR above 10,000 ft (above that limit specified for the previous requirements) is concerned -and such altitudes are rarer for the GA pilots- the requirements are tougher, with: 5 miles (8 km) of visibility, a 1-mile (1.6-km) separation from any cloud when flying at the altitude of the clouds ceiling, and a separation of 1,000 ft (300 m) when flying either above, or below, the ceiling. As far as any flight under the beginning of the controlled airspace in a country (that limit is usually beginning at 1,200 ft above ground level (AGL)) -which is usually the case for all flight beginning or arriving at a small aero-club, GA airport- the VFR requirements are eased, with: 1 mile (1,6 km) of visibility, and to stay out of the clouds
All that leads to that the GA, PPL pilots mostly are pilots who fly by daylight. How do they do that? Just by preparing their route, and following landmarks on the ground. In terms of specific wording, 'pilotage'is navigation by reference to prominent landmarks or checkpoints only and following a given course by reference to a chart. Such a flight may mostly performed in a area where landmarks and general configuration of the terrain are well known to the pilot and that no wind comes into play. Pilotage only needs some quick preparation like drawing the course on a chart, selecting prominent landmarks or checkpoints, correcting the course value from the magnetic variation to obtain your heading, with some swift estimation of time and fuel required. More generally GA pilots will use the 'dead reckoning' method, which is a improvement of the pilotage one. Dead reckoning indeed is adding more accurate computations for your flight adjusted by wind speed. That calcultation brings predicted heading along the intended path as the aircraft's speed provides accurate time to arrive at each checkpoint and the destination. Dead reckoning will also allow to fly above areas you are not acquainted with. That technique recently evolved in that sense that the GPS, and onboard computers began to be used aboard the GA planes; such techniques however have not become for now generally agreed standards in the aviation world. You will note that the dead reckoning technique we will describe is the one which is used in France. You'll have, to fly real-world flight matching to the nearest the practice in your country, to get further readings, on the Internet, for example

Basics and Fundamentals of a Navigation in a GA Plane
'Navigation', 'navigation flight', or 'long distance flight', or 'flight' may all be terms used to qualifiy a navigation in a GA plane, a flight, that is, that will bring you, your plane, and your possible passengers, from one terrain to another (thus, a former U.S. Space Shuttle flight, technically, was not a navigation, as the astronauts weren't able to ascribe the flight under that category on their logbook, due to such a flight leaving from the Kennedy Space Center and -usually- landing back there; both the takeoff and landing locations being the same, such a flight was not a 'navigation', in the reglementary sense). To perform a navigation flight, aboard a GA plane, needs that you know some basics and terms, which are going to be explained now. That section applies both to a pilotage or dead reckoning flight
 Basics
- the heading: the heading may be defined the magnetic route you're following when you're flying. When you fly on a straight line, you'll just follow one heading only, as, if the navigation you fly is composed of several legs, it might be divided into several successive headings. The heading, aboard a plane, is determined by the magnetic compass. The main hint to know about the heading is that the Earth's magnetic field makes that the magnetic North, on Earth, differs from the geographic one (the north magnetic pole, for example, is located about in northern Canada) as the geographic pole (the one of the geographic and aeronautical charts) is at the North pole! That difference is measured and known, and it's reported on the aeronautical charts -and taken in account by the onboard computers. That difference is known like the 'magnetic variation'. The variation may be East, or West (for example, you'll say that, at a given point, the magnetic variation has a value of 8 degree East). When charting a flight navigation, you'll have to take the magnetic variation in account so that the heading you compute be really the one which will lead you to where you want. Unless of that -in the example of a value of 8 degree East- you'll eventually get 8 degrees off your aimed location! A rule of thumb if that you'll have to substract a eastern variation from the heading you'll have measured on a chart, and add a western one; that's summarized by an aeronautical saying: 'West is best, and East is least'. The magnetic variation is modelized inside the Flight Simulator series, as Microsoft unluckily didn't find an easy way to find the value for it at a given point. There are different ways according to the FS versions to find that. In the older version that consists in getting into the simulator at the given location, to get it into the slew command ('Y') and to press the keyboard Space bar (in other versions, the key may change, like CRTL+Space bar in FSX); the plane is getting full (geographic North) as the FS display (in red, top left, press 'MAJ+Z') is showing the magnetic North. If that value is beyond 360° -in direction of the East, so- (for example, your plane is due geographic North, and the display is showing 005) you will have to do with a magnetic variation W (the opposite), of the value (a 5° magnetic variation West in that case), and the reverse (the value displayed being before 360°, 353 -in direction of the West- for example, you'll have to do with a magnetic variation E, of the value; in that case a 7° magnetic variation East)! Such a trick makes that you will see before hand the landscape above which you will fly (to avoid that, just let the planet at ground level when slewing). A other way to procede is to use magnetic charts available on the Internet -and made by the United States Geological Survey (USGS) service. Both versions are of use, the 2005 and 2010 versions with gross values -albeit useable- as FS9 is based on the 2000 one and FSX on the 2005. The other way is to use one Garmin GPS and to search for one or more VORs along your route as the Garmin gives their magnetic variation. Just take the value for the magnetic variation along the route you'll fly -about each 60-65 statute miles! Those values you'll take in account when computing your headings. Technically you might also remember that the 'course' of the craft is the intended path over the ground or the line drawn on a chart representing the intended aircraft path. The 'heading' of the craft is the direction to which the nose of the aircraft points during a flight and, more generally the value you will have to read on your compass and Heading Indicator. The 'track,' or 'ground track' is the actual path the aircraft is following by reference to the ground below
- the flight duration: the flight duration, or flight time is the time you'll take to fly from your starting, to our arrival location. The flight time will depend on the distance between the two locations, and the speed at which you'll fly between the points. That speed is called the 'cruise speed', the usual speed at which your plane is flying once the cruise altitude reached. The distance between two points, in the aviation world, is measured in 'nautical miles' ('NM'); 1 NM is worth about 1.15 statute miles. The speed of a plane is measured in 'knots' ('kts'); 1 knot is one nautical mile per hour. When computing your flight time, you'll have also to take into account the taxiing time, and flight time, you'll spend, at a slower speed, in the terrain or large airports environment, both for the departure and the arrival (in that case, you'll just add -by estimation- some more minutes of flight to your computed flight time, bringing to an 'estimated time of flight', thus to the famed 'Estimed Time of Arrival' (ETA)). Such a time frame will allow to forecast your flight, in terms of time, with such a duration possibly modifying along the route (some shift in the navigation, some headwind, etc., for example). As far as the speed of your plane, they come into two flavors: the 'indicated airspeed' (IAS); this is the airspeed which is shown by the airspeed indicator. As it's measured through the mean of the air pressure (which feeds, at the same time, other flight instruments), this value will decrease as you climb -with the air becoming thinner as you climb, hence the air pressure). The cruise speed of you plane is, in that way, independent from the airspeed displayed, at your cruise altitude, at the airspeed indicator. It's a value usually given for any airplane, and that's that value you'll use to compute your flight time. You can check such that real cruise speed in flight, when you're heading directly to a VOR-DME; it's displayed on the DME indicator in the radio stack
- the fuel consumption: the total estimated flight time that you'll have computed will allow too to compute the fuel quantities you'll have to take aboard. The fuel consumption of a plane is given by the manufacturer (in the anglo-saxon world, in gallons per hour)
- the flight altitude: the flight altitude is the altitude at which you'll fly during the navigation. One speaks of altitude only -and not of 'flight level' for the navigation aboard the GA planes ('flight level' is used for the flights at higher altitudes). The altitude of your flight will be determined by using the aeronautical charts, on which you'll spot the relief, and the possible artificial obstacles (smokestacks, antennas, etc.) you'll meet on your route. You'll have to choose the altitude of your flight by adding a safety margin of altitude to the highest relief or obstacle found on your route. The altitudes, in the aviation world, are measured in term of atmospheric pressure, as the altimeter is working on that basis. In the terrains and airports areas, or in the lowest parts of the aerial space of a country, you'll display in the window of the altimeter, through the knob of it, the 'QNH', the mean value for the area of the atmospheric pressure, that is. On a terrain, with that value set, the altimeter is displaying the terrain's altitude. Conversely, if you're on a terrain and don't know the QNH, just display, through the knob, the altitude of the terrain on the altimeter, and you get the atmospheric pressure for the area. When you're flying in the surroundings of a terrain, the QNH for the area allows you to know your altitude about the relief there (if the charts give a relief of some 2,200 ft below, and that your altimeter displays 5,500 ft, you're flying at 3,300 ft above the relief). Above a certain altitude, depending on each country regulations -in the USA that's at an altitude of 18,000 ft- any plane, in flight, must set its altimeter to the 'standard pressure' of 29.92 inches of mercury -or 1,013 mb. This is the mean atmospheric pressure, on Earth, at sea level. With that pressure set, all the planes, above the given altitude, are using the same reference. The VFR flights, in the USA, which occur mostly under 18,000 ft, are not concerned with the standard pressure (hence the VFR pilots there, have at their disposal automated stations along their routes, which give them local pressures, allowing for a correct altimeter set along the way, hence a safe separation from the relief under). In other countries, the altitude at which planes are to set the standard pressure at their altimeter is much lower, sometimes as soon as 3,500 ft. In such a case, the VFR pilot won't have to check the QNH, except when departing, and when arriving, that is when he's under 3,500 ft.
- how does the wind impact on a flight? The wind, function of whence and how strong it blows, and of at what altitude you're flying, may impact on your flight. The direction from where the wind blows, and its strength, are given to you, when you chart your flight, by the weather services. The wind may lengthen (headwind), shorten (tailwind) your flight, or make your route shift (sidewind). If when planning your navigation, you check that the wind will affect your flight somehow, you'll have to take that in account. Mostly in that, in the case of a sidewind, for example, that you'll have to set the nose of the plane 'into' the wind, along the route, of some angle, to counteract the wind, as, in the case of a head- or tailwind, you'll have to correct your total -and by legs- estimated time of flight in more, or in less. You'll be late, or early, at your destination. A head- and tailwind, moreover, will affect your planned fuel consumption accordingly (should, on another hand, the weather deteriorates somewhat during a flight, you'll be aware of that point while flying, as lengthening your flight may bring to be short of fuel; in that case, you'll have to land on a terrain -with fuel reservoirs of the grade you need- and to re-fill). The effect of a sidewind, at 90 degree to the direction the plane is heading to, is that, after 1 hour of flight, the plane will have moved into the drift by a distance in NM equal to the force of the wind in kts, like with a sidewind from the left of 30 kts, the plane will have moved after 1 hour to a distance to the right of 30 NM from the intended route.
- the aerial airspaces: each country has his aerial airspace featuring locations where the flight activities may be forbidden, restricted, or subject to various imperatives. Such locations like a preserved nature park, a missile test range, for example, will be allocated some specific airspaces at the purpose of preserving the quietness of the natural life, or to avoid any dammageable interaction between the army activities and yourself. Those specific aerial spaces are charted on the aeronautical charts, usually with most of their flight rules and altitude restrictions. Those data on the charts are complemented, in some countries, with some dedicated, more detailed documentation. The flight restrictions, often, will indicate the upper and lower altitude limits of the area, with, for example, the operations times in it. When planning a navigation, you'll have to take such airspace in account, either by flying above the higher limit, or under the lower one of it, function of the relief under, the weather and/or your plane's capacities (and even around them in some cases!). The onboard computers are taking those airspaces in account too. Each country too define, inside its national airspace, specific airspaces to the medium to large terrains and airports, obliging you too to take those in account, during the departing, and arriving phases -and sometimes the cruise phase- of your flight (see the tutorial 'Airspace Control and Phraseology')
Some Supplementary Remarks
- PPL renewal: depends on the country, as an exemple may be that the PPL is automatically renewed every 2 years provided that the pilot met his health examination, and that he performed 12 hours of flight and 12 landings during the last 12 months preceding the renewal, along with 1 hour of flight with an instructor
- the notion of 'VFR special': the 'VFR special' is when you're closing to your destination airport and that the weather deteriorated in the way thay your VFR conditions are not met anymore. Either you make a 180-degree turn and fly back, or you may ask to the control an authorization of continuing your flight. Such a regime allows you a weaver of the VFR rules for that part of the flight. You'll have to have 1 mile (1.6 km) of visibility and to stay out of the clouds however. The VFR special is not authorized in the aerial space of most large airports
- moutain flight: not taking in account the question of the special techniques to land on mountain airports -and categorized like such, flying in a mountainous environment -of it flying in valleys- may encompass risks linked to the specific weather conditions met there (in the morning, the winds are running the valley uphill, as, in the evening, they are running downwards, as turbulence may exist). Up- and mostly downdrafts are pecularily dangerous as they may make you loose much altitude quickly -especially as your altitude, in such an environment won't be much above the relief
- seashore flight: the temperature changes along the day make that, like for the flight in valleys, the pilot who'll fly along coastal regions will have to take in account that the wind is coming from the sea, in the morning, and from the land, in the evening -due to the inertial consistency, in terms of temperature of the sea
- priority rules between airplanes: the rule is that the priority is due to the plane coming from your right. When two craft follow exactly a same, reverse route, they have to avoid each other by turning right. When your speed is higher than the one of a plane ahead, and that you're going to pass it over, it's that plane which has the priority and that's you who'll have to pass it over by her right. A plane on a final has the priority on any plane on the ground, or flying (when two planes are on a final at the same time, it's the plane which flies lower which has the priority)
- rules of priority between airplanes and other flying vehicles: it's the most controllable craft which lets the priority to the less controllable one (the air balloons, on the other hand, have the priority on any other craft; gliders have the priority over the motorized balloons (Zeppelin-type), the planes and the helicopters; the Zeppelins have the priority over planes and helicopters; a glider-tower plane has the priority over any other single engine plane
- oxygen use: the VFR pilot considering a flight over high mountainous regions will be swiftly confronted to a problem he must be aware off: 'hypoxia'. Hypoxia is the the lack of oxygen in altitude due to that the air is becoming thinner, the higher one flies. The GA plane cabin are not pressurized as hypoxia, beyond a give altitude may even lead to unconsciousness. Hypoxia effects begin to be felt at an altitude of 8,300ft. The FAA however rules are like following, as pilots sporting health conditions, or smoking are concerned as soon as a altitude of between 8,000 and 10,000 ft. When a flight unfolds for more than 30 minutes between 12,500 and 14,000 ft, the crew must inhale a supplement of oxygen during the whole duration of the flight, minus 30 mn (as young, healthy pilots can endure flying 30 mn in a rarefied atmosphere). Between 14,000 and 15,000 ft, the crew must be supplemented with oxygen during the whole duration of the flight. And, above 15,000 ft, the crew must use that supplementary oxygen as the passengers must too. The oxygen supply, in the GA plane, is provided under the form of an oxygen bottle as the air is breathed through a light, oxygen mask
A Usual Navigation Aboard a GA Plane
->The Use of Smartphones With The FS Franchise
As the smartphones now get widespread, some brands are featuring applications to be used into the FS franchise (check more with a search engine on the Internet). Microsoft operating systems for smartphones however do not feature much such applications. A idea, to remedy that, is just to appropriately formalize checklists or flight plans unto a .gif or .jpg picture, for example, as you will be able to use those instead of the FS default kneeboard. Fine!
A navigation flight aboard a GA plane is a fine experience. The first such training, during a PPL pilot training occurs during the second part of its 40-hour courses, bringing him to see how to fly your plane on large distances. The description we'll give below of how to prepare -and perform- such a navigation is mostly the dead reckoning method. It does not match however strictly descriptions or data you might find with other reference as it builds mainly upon the French technique of navigation. That one in some sense is more of a intuitive brand as opposed to more accurate computation or flying method you will find with the Anglo-saxon methods. Any worry of more realism will need that you search any appropriate documentation to your country on the Internet
How to Chart the Course?
- The pilot charts the course at the terrain proper, and not at home. He will get to the pilot's lounge, or any appropriate room for that. He needs a large table, as the aeronautical charts are of the large size type. The VFR charts are fine, colored charts, with shaded relief. You can check in the FS2002 directory, at 'Charts' to get some example of those. According to the countries, the pilots use too of the charts and documentation specially dedicated to the reserved or limited airspaces. In most cases, too, the pilots are using, as far as departing and arriving is concerned, the maps dedicated to the terrains, and possible, detailed aeronautical charts describing the large airports environment. The VFR charts, on the Internet are not that available. One site only is giving freely such maps for the USA (with some high altitude, few useable ones for Europe and the Middle East) as you'll be obliged in any case to re-assemble the small patches of map to get some really useable. Other ways just resort to your imagination (on those to reassemble pictures taken in 'View of the Chart' in FS)
- the pilot, then, charts the course. Useful tools are a protractor and a ruler, or a plotter which consists in both as a calcultor also is of use to ease computation. He just draws, on the map, with a ruler, a draw which joins the both locations he's departing from, and arriving to (the draw goes from the center of a terrain to the center of the other, except when one or both terrains are medium or large airports, with published points of exit, and entry, of their airspace; in that case, the draw begins and/or ends at such a point. Function of the limited and reglemented airspaces under any direct route, or of other contingencies, the course may have to be divided into several legs. Once the draw or draws drawn, the pilot will use a plotter to measure the heading of the route, or of each of the legs (the idea is that the geographical North, on the charts, is at a right angle to the horizontal; thus, the base line of the plotter is aligned with the horizontal, as the heading is read along the graduated arc of the plotter). Those headings ARE 'headings read', that is that they don't take any magnetic variation in account. Let's do that! On the charts, the magnetic variation for the map, is indicated on the chart. As the magnetic variation likely won't be the same for the varied FS versions, just use any method to know what magnetic variation FS is giving along your route. Once done, just add, or substract those values from your heading read. You'll get 'true headings', the actual headings, that is, that you'll follow during your flights. Back to the chart, now. Just interest yourself, this time, to the altitude of the relief along the route (or legs) and the possible altitude restrictions of some restricted airspaces and determine the altitude you'll be flying at. note: on the real-world aeronautical charts, a facilitating tool is that the charts are divided into quadrants and that, for each quadrant, in strong characters, the fisrt safety altitude above the relief is given (just use it like a basis). You'll let, according to the countries such or such altitude above the highest terrain on the route (in some countries, for example, you'll have to fly at a sufficient altitude above the relief to allow for an emergency landing in case of an engine failure, as a minimum of 1,000 ft, in any case, above the highest obstacle in a radius of 2,000 ft (600 m) is needed; generally, further, 500 ft of separation is required relative to any water surface, sparsely populated areas, any ship, person, vehicle or any surface constructed feature). The most important however, in any case, is to use what is called the 'circular rule' for the VFR altitudes of flight. The 'circular rule' is that principle which determines the levels of altitude according to the heading, thus separating the planes flying in contrary directions. In the US, the VFR circular rule is the following: any flight with a heading from 360 to 179, must have an altitude with a odd number of the thousands (to which 500 ft are added): thus 3,500, 5,500, 7,500 ft, etc. as any plane flying on a heading between 180 and 359 must have an altitude with an even number of the thousands (to which 500 ft are added): thus 4,500, 6,500, 8,500 ft, etc. The circular rule, in some countries, applies above 3,000 ft only. The pilot, at last, measures the total distance of the flight, based on the chart's scale, allowing to compute the total estimated time of flight (and the ETA -Estimated Time of Arrival) and, from that, to calculate the fuel quantities to embark for the flight. All those date, along with the previous ones, you will note on a draft sheet. As far as the first choice of a route is concerned, you'll note that in the USA, for example, there exist low altitude, preferential VFR routes, akin to the high altitudes ones used by the airliners, which are defined between VORs
- more about wind correction. At a given altitude you may encounter some substantial wind on your route, resulting into a drift from your intended course. The drift angle is the angle between your plane's heading and actual groundtrack resulting from the wind drift. Correction for wind drift is based upon the concept of 'wind triangle.' When charting your course, the line you will have drawn on the chart from the departure, to the arrival point, or the course in degrees will have to be corrected for any forecasted substantial wind along the route. The wind correction has to be computed before the correction for the magnetic variation. The method for that is like follow. On a separate sheet of paper, draw a 'wind triangle.' Draw first a vertical line representing the North-South axis. With the protractor draw the course you calculated on the chart (for example, a course westwards at 270 degree starting at A). Then draw a line from A representing the direction the wind is blowing to (which is 180 degrees from where is is blowing from, like stated by the weather bulletin; for example with a wind from the northwest, or 315° drawn the line to the 135°). Then, after chosing a whatever, appropriate length unit for your ruler, mark a point unto the wind line which matches the wind speed and name it W (in our example, let's suppose wind at 30 kts, hence 30 units on the line). Using that same length unit, now spot where your plane will have reached after one hour on the course line. For a plane with a speed of 120 kts for example (or 120 NM per hour) that will be done by placing the ruler's end at W and orienting the ruler so it intercepts the course line at the 120-unit mark. Draw that line and mark the point as P. With that diagram you can now both get two data of importance as far as wind drift is concerned. Using your length unit, measure the distance A-P with the ruler, with gives the distance you will really fly in one hour given the wind. In our example, let's say about 80 NM (or your average speed, that wind constant, will thus be of 80 NM per hour, or 80 kts). Using the protractor, now measure the angle A-wind speed-P, from the North-South axis, which amounts in our example to 280 degrees. That value is just the heading we will have to fly to correct for the wind drift, relative to our measured course on the chart! From that, now only you will apply the correction for magnetic variation to obtain the magnetic or true heading, which is the one you will have to read on your compass and Heading Indicator. Such values further will help you to determine also your fuel consumption with that wind
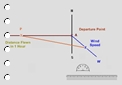 | click on the picture to a view of the wind triangle method |
- you will then determine the landmarks you'll use along the route to check your navigation. The rule is that you'll take a mark about each 10 minute of flight (it suffices to compute, for your craft, how much miles 10 minutes of flight, at cruise speed, means, and to use the value on the chart). The landmarks, which will determine the waypoints of the route, have to be easily and unmistakenbly identifiable ground landmarks. Those will mostly be highways, roads, rivers, railways, medium to large cities, etc. Thus, each such miles (use the ruler), along the route (or the legs) you draw, just search those landmarks and note them on the chart (which some check, or a small draw). And write a short description for them on your preparatory sheet: 'river', 'river and road', 'city' are enough for the regions you don't know, as for the regions you know, the real name for the landmark may be noted (like 'the Susqueswanah River', 'city (Abilene)', etc.). Then you just compute what distance lies between each of your waypoints (and, from that, the flight time between each of them: distance in NM divided by the plane's speed in kts) and you note all that on the preparatory sheet (landmarks/waypoints, distances, flight time)
- the data concerning the departing and arriving terrains now (those data are found on the aeronautical charts, are more detailed ones are given on the dedicated terrains' charts -those charts which describes the terrain; those charts are relatively more accessible through the Internet now). Those data needed for your flight are: the available runways, the airport's altitude, what the altitude and hand of the airport traffic pattern (if any), miscellaneous frequencies of use (tower, arrivals, departures, etc.). Charts intermediary between those and the VFR charts will give you, further the possible points of entry, and the possible VFR paths to follow, into the airspace surrounding large airports. Another point, on the other hand, is that you'll have, for any VFR flight, to choose a 'diverting terrain', a terrain you'll use in case of any trouble (weather, engine failure, etc.) along your route (you'll pick up, on the chart, a terrain matching what is needed for our GA plane to land; it will be mostly located either side of the route, at some reasonable distance, about midway). For that diverting terrain, just take too the appropriate date (runways, frequencies, altitude, etc.), like above. About the diverting terrain, in much countries, they are seldomly used to actually land, with the navigations mostly unfolded without troubles; it's mostly a safety procedure. At last, last data to be obtained: the NOTAMs. The NOTAMs are aeronautical advices emitted by the aeronautical authority of a country, as they are stating the latest warnings concerning the airspace, reglemented areas, terrains, etc. Such NOTAMs are to be found in the pilot's lounge, or, now, on the Internet (example: a NOTAM may tell you that an aerial festival is taking place on the Sunday, April 15th, 2007 on the terrain of Abilene; with some temporary restricted airspace extending from the ground to 15,000 ft, between 01:00 p.m. to 17:00 p.m.)
- the pilot, at last -and that's important- is getting the data about the weather (at both terrains, and en route). Those weather data dedicated to the aviation are available from humans, at weather stations, of from automated stations, of from the Internet, now. Thus, you'll get the pressure at the terrains, en route; the clouds ceiling, wind, etc. (idem: terrains and en route) and the possible forecasted evolution of the weather during your flight). Among those data, the wind ones will be used to potentially add some correction to the heading(s) you determined for the route in case of a sidewind, or to the total flight time (and the ETA) in case of a head- or tailwind
- well! Now, you've gotten all your data for the navigation. Most are noted on the preparatory sheet and the chart. Let's get all that to useable. A route sheet is mostly used by the pilots (with some standardized, in an aero-club, for example), providing them with the summarization and main data that will be used during the flight. Here are the data one can write on such a sheet: plane's registration number, plane's type; departure terrain (with frequencies, data, etc.), arrival terrain (idem); remarks for en route; ordered display of the route (time of departure, takeoff on runway such; such time on the traffic pattern, etc. and with the landmarks/waypoints, the headings and time to reach them. And the data for the arrival (such procedures, VFR path, entry point, traffic pattern, etc.); the total estimated flight time (all the values above added); estimated time of arrival). And the fuel quantities (such quantities embarked; a VFR flight needs that you have fuel enough for the flight and a reserve allowing for 30 supplementary minutes of flight -as you're obliged, in any case, to land with those 30 minutes of supplemental fuel)
- at last, you'll decide whether you file, or not, a VFR flight plan. A VFR flight plan is a document which is transmitted to the aeronautical authorities and which serves mainly to trigger the rescue teams in case you wouldn't check at the arrival aiport at the declared time. A flight plan, for a VFR flight, is not mandatory. Should you decide to file one, you'll transmit it by phone, or the Internet (on the flight plan sheet, you'll write down all the data required by the air controllers to follow your flight, like: the plane's registration, type, the name of the pilot, the time of departure, the ETA, the total estimated time of flight, the departure and arrival terrains, the route, altitude and speed, the fuel embarked, the number of persons aboard, etc.). Once arrived at the airport of destination, you'll have 30 minute to 'close the flight plan', meaning that you'll phone back, or via the Internet, to tell that you're well arrived. Should you opt for a flight plan, you'll have to contact the air controls along your route (and thus take their frequencies on the chart), signaling that your crossing their airspace under a VFR flight plan, and you will pass from a control center to another
Performing the Flight
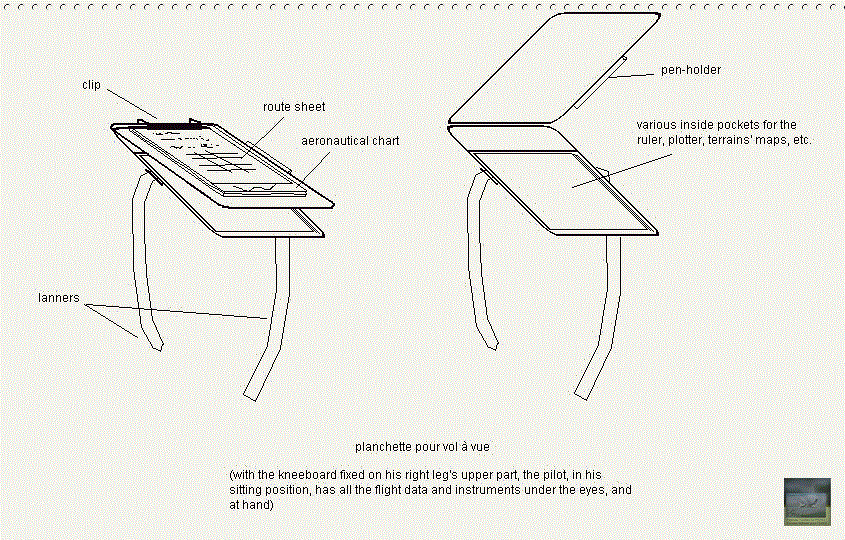
 | click on the picture to a view of a kneeboard |
- To fly the navigation you prepared consists simply to now go to the plane at the time you decided for the departure, and to takeoff, depart, fly and land at the terrain you chose to go to
- technically, some hints about how the pilot's 'hardware'. As we'll be flying using the chart and visual landmarks on the ground, we'll have to get all those data easily at hand, and under the eyes: the route sheet, the map, a pen, a ruler, a plotter (in case he would have to swiftly, en route, plot a new course), etc. The GA pilots, for that, are using a 'kneeboard', a device which holds the documents and which is stripped around the pilots right leg's upper part (that's not truly modelized in FS, with the so-called kneeboard and checklists, as, by worry of realism, you may buy one at an aviation shop). The other tool of the pilot is a watch (yes! Those impressive pilot's watch are really used for flying too! LOL). You may use an onboard watch too but real-life pilot prefer a wrist, graduated-crown featured watch! A simple, cheap one is mostly enough. The crown is the most used feature for a GA flight. Here's how that's working: the graduated crown is mobile relative to the watch; it gets a mark for 12 o'clock and the 11 other ticks, with the minute ticks too; when one takes off, one will turn the crown to have the '12 o'clock' on the largest needle of the watch, which marks, with the little one, the time it is at that moment. As the next waypoint/mark -when we'll be exiting the airport environment- on our flight is 7 minute away (for example, if we're ready to take off, and that it's 9:10 a.m., we'll reach there out at 9:17 a.m. Thus, the crown's mark will be a much useful reminder: when the large needle will reach the 12 mark PLUS 17 (that is :17 at the crown -and not at the watch), we'll have finished that first part of our flight. From there, you'll look at your flight route sheet, and see that our first waypoint is now 10 minutes ahead. Well. Whatever the time at the watch now, just place the crown's 12 where the large needle is. When the needle will reach 10 at the crown (and not at the watch!), you should be over the waypoint! Simple! And again all along the route!
- the flight (following): using your wrist watch (or, at default, the plane's watch), and the kneeboard, you'll now perform the flight. MOST IMPORTANT, just remember that you're a VFR, not IFR pilot. THUS, you'll fly visually mostly. At each new heading you'll take, just look far away ahead to any landscape remarkable point and maintain your plane's heading through it ONLY, just glancing barely to the heading indicator and some other flight instruments! (don't confound those marks you'll use to fly, with the clocked ones used for the navigation!). And a new mark once over there, etc.Take off, etc. Once you're leaving the traffic pattern, for example, you check the flight sheet and you see that the next waypoint is a highway, at the 289 heading, we'll be reaching in 10 minute (all that, you've written on the route sheet! He he!). Well, you just steer the plane to the 289 heading, place the watch crown's '12' on where the large needle of the watch is now, and you fly (usually, before the ten minutes are elapsed, you'll reached your cruise altitude and configure the plane for that). AND 10 minutes later (check the watch's crown, the large needle is arriving there), just look at the landscape for the landmark. Hey! Here's the highway. Route sheet: next landmark is a large river, at 11 minute and a 278 heading. Well. Captain! Heading 2-7-8, the '12' of the crown on the current location of the large watch's needle, and here we go again! And 11 minute later, the needle reaching 11 at the crown, you should see the river. As you see, that's not much complicated. Just some attention! And like that until to get in the neighbourhoods of the destination terrain, where you'll perform the arrival procedures, and land. Taxiing. Parking. Here you are. You'll have performed your first VFR nav!
- check that too: for a navigation flight, the pilot must also have aboard the various regulatory documents for the plane, the plane's operating handbood, and, with him, his own pilot's documents
How to Chart and To Perform a Flight in FS?
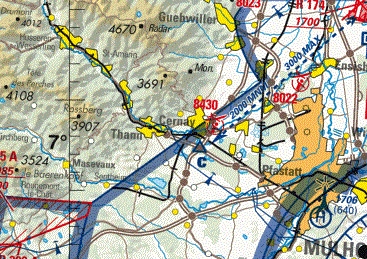
Useful sites like Skyvector.com, are providing for real world VFR charts! (the excerpt here is a VFR chart for France from Carte Aero) (non-clickable illustration) |
Useful sites like Skyvector.com for the US, or Carte Aero, for France, for example, are providing for fine real world charts. Such charts combined with a Direct GPS route drawn in FSX with the Flight Organizer, for example, almost directly provide for a chart useable to find landmarks and to fly with. We however kept ancient pages related to other techniques. Check, for FS2002, our tutorial "A Alternate Technique to the Computation of A Navigation in FS", which may serve like a basis to innovate with your own technique. The technique described hereunder allows to remain at the closest of the technique used in the real world, with a printed chart
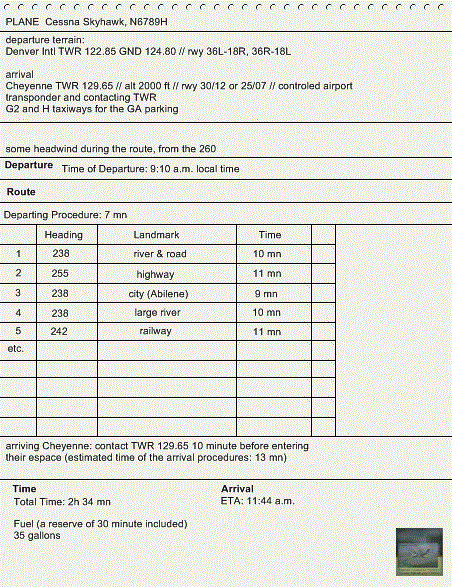
 | click on the picture to a view of a flight route sheet for a VFR navigation |
All such a navigation is perfectly performable aboard FS! Just take a map of a computer-useable atlas; you've got your plane's cruise speed, its fuel consumption. Download some real weather from the FS Internet. Just have the map for your route; simulate on it some restricted areas (a military area for low altitude flying, some 1.4-mile wide, from 1,500 to 3,000 ft AGL; a natural reserve area with an interdiction of flight from the ground to 7,500 ft AGL, and, say, an important airport airspace: an inverted marriage cake up to 10,000 ft AGL -at one place, you'll certainly be able to fly under the restricted airspace). From the departing to the arrival terrain, you draw a route (or a route with legs if necessitated). Just get into FS to check the magnetic variation from the departing terrain to the arrival, by intervals of about 60-65 miles. With a plotter (you may tune one, from some heading indicator in a drawing software, and using the transparency settings of the software you use to visualize the chart), you measure the heading of the route (legs). Let's say: 240, 257, 240. Just correct those headings read with the values of the magnetic variation. Let's say a 2° E variation all along the way, bringing to 'true headings' like 238, 255 and 238. Just note that! Consider the map now and look for the highest relief (or possible restricted areas) along the route (or, on an aeronautical chart, the highest value on the quadrants along the route) AND determine, with the circular VFR rule our flight altitude. If the highest altitude to clear along the way is, say, 1,700 ft, with a restricted area upper limit at 3,000 ft further, thus we'll have to fly, in any case, higher than 3,000 ft (in a VFR nav flight, it's always preferable to fly above 3,000 ft in any case; that gives you a margin). As we'll fly mostly West, between 180 and 369 degrees, our altitude will have to have an even number of the thousands + 500 ft: thus 4,500, 6,500 or 8,500 ft. Let's take 4,500 ft -that at your discretion; with 4,500ft, we'll have enough for that VFR flight (you'll note that, as the GA planes are not pressurized in the cabin, such altitudes beginning about 9,000/10,000 ft are bringing the pilots -and possible passengers- to a rarefied air, and lacking oxygen, a phenomenon called 'hypoxia'. Thus, flying over some strong mountain ranges will need that the pilot takes oxygen supplies and masks and breathe that, by interval or continually, at those altitudes). You report to the preparatory sheet all those data. Back to the charts! You'll look now for ground landmarks/waypoints, with one each about 10 mn of flight. Just compute the distance, in NM, between each waypoint, and calculate the time of flight (distance(s) in NM divided by the plane's cruise speed in kts). Note that. Now studying the departing and arriving terrains: write down on the preparatory sheet the date you'll use (frequencies, runways, altitude, traffic pattern, point of entry or departure in a large airport environment, where is the GA parking, etc.). The NOTAMs now. And the weather (just go in the weather panel in FS and check the wind, pressure at the departing airport, the arrival one. And the ceiling at both there too, with the ceiling en route, and the possible winds en altitude, etc.). A weather briefing must contain only the data you'll really need, and not the entire weather. An example may be: the wind will be of 2 kts from the 280 at the departing airport; the QNH of 30.12, with a weather clear, and a 6-mile visibility. The weather forecasted at the terrain of destination will be a wind of 6 kts from the 275 heading, with a QNH of 29.99; we'll have 2/8th of cumulus at 3,000 ft and a 9-mile visibility. The weather en route will be: some scattered cumulus, a wind of 10 kts from the 260 heading until an altitude of 5,000 ft. From those data, we'll deduce the heading of the active runway on the departing terrain; the weather at the aiport of destination seems OKay, as is the weather en route (it's VFR). We'll have some headwind, which will brake us somewhat. NOW, the preparation is over. You just write all that down on the definitive route sheet, which you'll use during the flight (see another example of route sheet on the illustration). You decide to file a VFR flight plan, or not. AND you're ready to fly!
Just heading to the plane now. Getting she out of the hanger. Some fuel. Preflight checklist. Pilot -and possible passengers- embarking. Engine start, taxiing, runup... and takoff! Thus, in the cabin, you're featured, like said above, with your kneeboard, chart, various devices and docs, the watch). At take off you set the crown's 12 in front of the large needle, the time we estimated we were going to need to take off and get out of the traffic pattern. 7 mn later (our estimation may have been right, or false pecularily on the larger airports, when more planes may have been departing and taking off ahead of us), we're getting out of the pattern, and taking our first heading and climbing to our cruise altitude. A swift look (it's better to keep most of one's time to piloting!) to the route sheet, as we see that our next waypoint is on a 238 heading, is a river and a road, and is 10 minute from now. The crown's 12 on the current position of the large needle of our watch, we take a 238 heading, climbing (thus no landscape clue). Say we eventually reach our cruising altitude of 4,500 ft. Plane at level, configured, etc. The watch is telling us that we're 2 minute from our first landmark, as when the needle nears 10, then, we'll look for that river and road! Well, here they are! We keep flying as the landmark eventually glides under the plane. Route sheet: next waypoint is a highway, at a 255 heading, 11 minute ahead! Crown's 12 on the large needle, steering to a 255 heading and you take a mark ahead to maintain the heading visually only! When the needle of our watch nears 11 at the crown, we look for the highway. Oh! A well defined highway, easily recognizable (usually, it's rare to get lost on a VFR flight!). Well! We just fly all the waypoints we determined as, by intervals, we'll re-set the heading indicator to the magnetic compass, correct some possible sidewind, for example (in our flight, that's not the case, as we forecasted a headwind only), and, according to the country where you fly, we check regularly the atmospheric pressure to maintain a correct altitude. we eventually now come to the neighbourhoods of the terrain of destination. You'll note that one may get one minute in less, or one minute in more at some waypoints, and that's not important as it eventually may get balanced along the whole flight. The terrain is a medium-sized one, with some concentric airpace zones around, mandatory transponder and authorization required. You just radio to them, ask for entering the zone (or even, as soon than that, for landing). AND the controllers give us headings, altitudes and speeds, down to the beginning of the final. One follows that; final, flare... and landing. Exiting the runway; the runway's clear. Taxiing. Parking. Engine cutoff. A look at the watch. Note what time it is (it's your actual time of arrival). Configuring the plane for the parking. Pilots (and possible passengers) disembarking. If you filed a VFR flight plan, you'll go to the pilot's lounge to phone call or use the Internet to close it. Flight's over. Great first nav
You may also check a tutorial about how to chart a course with FSX
An Overview of How to Navigate with the New, Onboard Computers
The pilots now have at their disposal new, onboard computers. The flight community has not come to some general agreement about the use of such tools as some more years will be needed to know how the techniques those tools are bringing will match and mix with the current techniques of the VFR navigation. The main point is that the navigation like we described it above, is complemented, through those computers, with the intersections, VOR and various navaids, which usually are used by the IFR pilots only. The most advanced of those computers are reserved to the use of the IFR pilots (those pilots who fly through the instruments only, under the control of the air controllers, without any ground -or even air- reference anymore). Those computers allows the pilots to compute and fly their routes. As far as FS2002 is concerned, the flight organizer and the GPS featured since the FS2000 version, allow, somehow, to approach that new type of VFR navigation as the newest versions contain real such computers
- how to create a navigation in a onboard computer. First, you'll have to know that much such computers are based on a rack-extractible principle: the rack remains aboard, as you take the computer with you. Thus, you have the computer in the pilot's lounge and may program it there. Some other models are fix, obliging to program onboard, basing of a flight prepared according to the traditional methods, in the pilot's lounge. Before programming the flight, just take the weather and the NOTAMs. Then you enter the necessary date into the computer (time of departure, departing terrain, arrival terrain), as it's the computer, with its database, which will automatically generate a flight route (those computers also incorporate the more advanced departing and arriving procedures that the SIDs and STARs are (see the tutorial 'Airspace Control and Phraseology'. The route calculated by the computer may be edited, by adding, for example, adding waypoints of your own. And you'll prepare, at the same time, the opposite route. Or you'll have to prepared it at the destination terrain (for a usual VFR navigation, one usually prepare the return flight when preparing the navigation). The nav being calculated, you just head to the plane! Note: the use of an onboard computer needs however that you take with you some pen and paper sheets to be able to note the data and instructions by the potential controllers during the nav
- how to fly an onboard computer-prepared VFR navigation? That's easy! The pilot will just follow, by steering the plane, the flight path which is drawn on the screen of the computer, or to keep the plane's symbol on the route's line. The navigation, thus, is much easier. The VFR pilots however have to bring a special care to that they don't instruments fly, but keep VFR fly. THEY MUST, first pilot visually, as they will take a landscape mark ahead, on their heading, and steer according to that. AND they will just check that flying to the route indicated by the flight computer. Another way to procede with, is to take some ground landmarks anyway and to complement the route of the computer by those landmarks, making the route safer. You'll note that the pratique of some flightsim pilots to compute the route through the 'Flight Organizer' and then to couple the GPS with the autopilot is not conform to a real-world practice! While flying along the new techniques, using a flight computer, a particular attention has to be brought to a new heading (the computers however indicate to you the road you'll have to follow during the turn; that's not modelized in the FS GPS; you'll learn, through the practice, when to begin the turn to stay on the route, to the best)
- some more details: the magnetic variation is incorporated into the flight computers (and in the FS GPS too). They unluckily are badly managing the altitude of a flight as they work based on a 'GPS altitude', an altitude above the mean sea level. Any altitude reference during a VFR flight using an onboard computer, will have to be done with the plane's altimeter, and not the computer! The onboard computers are computing too the actual wind along the route, and take it in account to automatically correct the route (not simulated in the FS GPS)
Website Manager: G. Guichard, site Lessons In Microsoft Flight Simulator / Leçons de vol pour les Flight Simulator de Microsoft, http://flightlessons.6te.net.htm. Page Editor: G. Guichard. last edited: 5/7/2016. contact us at ggwebsites@outlook.com