 .home page .back Tutorials. GA Planes
| Important! To Read! those tutorials about the night VFR and IFR ratings, and about flying the airliners are not as accurate and reliable than those dedicated to the VFR flights. It's because we really practised the VFR flights, as we didn't ever qualify for the night VFR and the IFR ratings nor any commercial license! Our tutorials about such flights are based on our VFR experience only, and augmented with data and readings taken from the Internet! People who would like to find in those the same level of accuracy and details than in our VFR tutorials, should better turn to further websites or source. People who are just looking for a honest level of realism might be satisfied already with the level of our tutorials about the night VFR, IFR flights, and the ones aboard an airliner |
The night VFR rating generally is acquired by the VFR pilots who want to be able to fly after sunset and before sunrise, allowing for longer week-ends... The night VFR rating, on the other hand, is often part of a move which leads to the IFR rating. You will note that those flying skills beyond the basic PPL are called ratings as they are not new licenses by themselves. When you'll train for these, you'll not get a new license, you'll just be officially recognized new flying skills
Flying night VFR means to fly VFR, by night. To fly by night first requires that the apprentice gets a first initiation to the instrument flying. Technically, such an initiation is not IFR flying strictly but, better, flying without visibility. In the real life, in France, for example, the night VFR rating brings the pilot to take a 3-hour, flight without visibility training, a 3-hour night flying training -mostly centered of the practice of the airport traffic pattern by night, 5 night take offs and landings, and some night navigations

 The Flight Without Visibility
At the exception of pecularily well lighted flight environments like large airports near large cities, for example, the night VFR flight, as far as take offs and landings are concerned, or when performed in the countryside over particularly inhabited and dark areas, may be assimilated to IFR flying. Such conditions indeed do not allow anymore to see the landscape, thus to get the visual clues with the natural horizon and the panel's upper part you get accustomed to with our tutorials dedicated to the basic flight maneuvers. Once you'll be flying level over usually populated areas, or you'll be taking off or landing from well lighted areas, you'll be back to a VFR flight (a night one, of course), with the diffuse, sumber light coming from the stars, or the cloud ceiling taking in -from far away- a part of a city's lights giving a sufficient view of where the horizon is; not taking in account a night when the Moon will be present. So, first, back to the classroom for the flight without visibility
From what terrain can you fly from and to? The night VFR flying necessitates a terrain with some night lighting, and which is rated for the night VFR (such a rating is usually found on the terrains' maps). Should, for example, your terrain not have such a homologation, you will have to fly with your instructor to the next terrain which had gotten it
The theory for the flight without visibility. To fly without visibility means to fly by using, like a mean to know the flight attitude of your plane, the six, basic gauges of the plane's panel. The airspeed indicator, the artifical horizon, the altimeter, the turn indicator and coordinator, the heading indicator and the vertical speed indicator, that is (from the upper left and to the bottom right of the panel). As we didn't found much documentation about the 'flight without visibility' practice for the night VFR, as differing from the real, IFR practice, we'll give hereunder the basics of the IFR flight, as most of those data are synthetized from the lessons by the FS2000 instructor Roy Machado in the French-speaking version manual of FS2000, and that you'll find those techniques back when you'll choose to pass IFR. Here are the basics for how to fly a plane with the reference to the flight instruments only (the steps of the procedure are the same for any of those! The plane, first is set into the attitude or pitch through the AI, with a first, quick tab setting. Then, the radial reading with the AI the major reference (moving for the AI to the one, or more gauges controling the move as any corrections is made through the AI only). Then a fine tab tuning, through the VSI. At last, time permitting, a control reading):
. placing the plane into a given pitch: while instrument flying, to place the plane into some new, given pitch, is made through the attitude indicator (or artificial horizon). Using the attitude indicator's accurate marks, you'll place the plane, for example, in a climb, or in a turn. And then, you'll perform a first, gross trim
. the 'radial reading': the second step, then, is performing a typical procedure which brings to control the plane as it's in the said pitch. This control is called a 'radial reading', as you'll radially read, according to a standard circuit, the flight instruments necessary for that control. Each plane attitude needs a specific radial reading. In any case however, the radial reading starts from the attitude indicator, as it's the flight instrument which controls the plane's main pitch
. fine-tuning the attitude: the next step is to fine-tune the plane in the pitch, with the help of the vertical speed indicator (VSI) and the elevator's trim. You'll finely tune the trim and checking through the VSI that she neither climb or descent
. the 'control reading': the 'control reading', at last, consists -should the maneuver lets you time enough for that- into to read the six main flight instruments clockwise, beginning with the upper left gauge. Any change then is corrected through a slight action on the flight controls, and a check through the AI only. A good way to practice that control reading is the one Roy Machado is giving in the FS, with looking at under the AI and controlling the other instruments through a peripheral vision. Any change in the flight is then spotted!
. you'll note that the whole of the method (from the placement of the plane into the attitude until the end of the control reading) must not exceed between 7 and 20 seconds!
Let's now see in a more detailed way how the instruments reading are performed, into the flight, for each of the pitches and attitudes, considered that the steps of the procedure are the same for any of those! The plane, first is set into the attitude or pitch through the AI, with a first, quick tab setting. Then, the radial reading with the AI the major reference (moving for the AI to the one, or more gauges controling the move as any corrections is made through the AI only). Then a fine tab tuning, through the VSI. At last, time permitting, a control reading
-
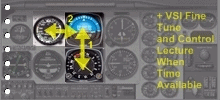 | The IFR readings for the climbs and descents (non-clickable picture) |
climbs and descents: the climb, or descent pitch is reached through the attitude indicator (AI), using the graduations located vertically in the indicator. Each graduation is worth 10 degree, with the intermediate ones worth 5. Function of the plane, placing it into a climb or descent pitch needs that the pitch be set at such or such value at the AI. A value, generally, for example, may be of about 13° for a climb as you'll adjust it to the specific value for your plane as given by the specs, or of just below the AI horizon for a descent. To place the plane into the climb or descentpitch is performed by pulling -or pushing- the yoke while looking at the AI, where one get the mark at the desired pitch value. Setting now the appropriate set of manifold-prop pitch-and mixture for a climb or a descent, and set a gross trim. AND, now, the radial reading for a climb or a descent (any radial reading, as we'll see that, includes a reference to the speed of the plane, as you'll have determined it through a set of manifold pressure-propeller pitch-mixture). The radial reading, for a climb and descent has always to be the following: AI-heading indicator-AI-airspeed indicator-AI-gas. The AI is read to check that the mark is on the desired pitch graduation; the heading indicator is read then to check that the plane is not in a turn (the heading is remaining constant); back to the AI (if some turn was checked, it's corrected through the AI now); to the airspeed indicator now, checking that we're well at our desired climb or descent airspeed; the AI back (in any deviation from our speed is corrected then through the AI: slightly more or less pitch to slightly reduce, or increase the airspeed); and eventually back to the airspeed indicator to check that the correction has been performed well (with usually no further adjustment needed). Like said, a fine-tuning now: using the elevator's trim, one fine-tune the trim and check meanwhile that at the vertical speed indicator (VSI -the climb rate is the one specified by the plane's specs). And one complete the procedure, time permitting, with the control reading! Got that?
 | click on the picture to a view of the accurate AI graduations for the climbs and descents |
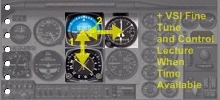 | The IFR readings for the return to level, from a climb or descent (non-clickable picture) |
- back to a level flight (on a constant heading), from a climb or a descent: let's now have the yoke to have the AI mark to neutral (in the FS, it seems like that mark is mostly overestimated to up, somewhat). Let then the plane accelerate. Apply the set of your choice for the manifold pressure-propeller pitch-and mixture. Set the trim grossly. And the radial reading for back to a level flight, from a climb or descent is the following: AI-heading indicator-AI-altimeter-AI-airspeed, possibly. AI: the mark is at neutral in pitch; heading indicator: the plane is not in any turn; back to AI where any turn would be corrected; to the altimeter now: the plane neither climbs nor descend; back to AI where any deviation would be corrected; and the airspeed, possibly, through the settings (manifold-prop pitch-mixture). And the fine-tuning through the elevator's trim and VSI. And, duration of the level flight permitting, the control reading
 | click on the picture to a view of the accurate AI graduations for the turns |
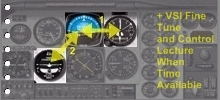 | The IFR readings for the turns (non-clickable picture) |
- turns (level turns). The method is just the same than for the other pitches of the plane. Instead that you put the plane into the attitude -a turn- using the visual clue between the horizon and the panel's top, that's done through the attitude indicator (AI), like: yoke AND rudder (don't forget that: any turn is YOKE plus RUDDER!), the turn mark at the AI on 30°, once the turn pitch acquired yoke/rudder back to neutral, checking now that the plane is performed at the standard rate -which is checked at turn coordinator and indicator (the symbol's wing on the white mark). Keeping the altitude at its value of when the turn began (with some yoke's pull, possibly). Some trim for that. AND you perform the radial reading for turns, which is: AI-altimeter-AI-turn coordinator and indicator-AI-airspeed. The AI is used to check that we're in a 30 degree-mark turn; altimeter is to check that the plane neither climbs nor descends; back to the AI for any correction of that; turn coordinator and indicator: the plane is well in a turn at a standard rate; back to the AI to any possible correction for that; aispeed: checking the airspeed for any possible tuning of the manifold-propeller pitch-mixture settings. If the turn is of a long duration, you'll have time for some fine-tuning of the trim (at the VSI) and for, possibly, the control reading
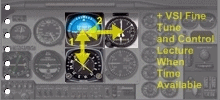 | The IFR readings for the return to the horizontal flight, from a turn (non-clickable picture) |
- back to a horizontal flight, from a level turn. You stop the turn with yoke/rudder -checking the horizontal at the AI, yoke/rudder to neutral to stop the plane there. Possibly some yoke forwards. Setting the trim grossly, as the radial reading for such that maneuver is the same than for back to level from a climb or descent: AI (the turn mark at 0)-heading indicator (no turn)-AI (possible correction)-altimeter (no climb or descent)-AI (possible correction)-airspeed (manifold-etc. settings, possibly). Further the fine-tuning with the trim and VSI. And the control reading with the 6 instruments if this phase of the flight allows for
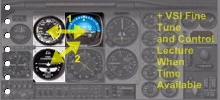 | The IFR readings for the climbing, or descending turn (non-clickable picture) |
- some last effort, now! Let's study the turns climbing, or descending. The turns climbing: with the plane set into a turn, and into a climb at the same time! Yoke/rudder to put the plane into a turn at the AI (30°), yoke/rudder to neutral, and a climb pitch just after: pulling the yoke to the AI to get the climb pitch there, with the manifold-prop pitch-mixture needed. The plane now is turning (it's keeping being a standard rate turn -white mark at the turn coordinator and indicator), and climbing (the correct speed for climbing at the airspeed indicator). Some trim grossly. AND the radial reading for the turn, climbing is: AI-airspeed indicator-AI-turn coordinator and indicator-AI-airspeed settings, possibly. The AI is checked for the 30° turn mark, the airspeed indicator to check that the airspeed is the one desired for a climb; back to the AI for some possible correction (adjusting the climb pitch will bring the airspeed to correct); the turn coordinator and indicator is well indicating that our turn is at the standard rate; back to the AI for any possible correction. And, the airspeed settings for a possible correction (manifold-etc.). It the turn is long enough, ending with a fine-tuning through the elevator's trim and VSI, and a control reading. To exit the maneuver, should one stop the turn before the climb or descent (or conversely) or should one exit the turn and climb or descent at the same time, the move is done through the AI in any cases, as the radial reading, in any case, is the same than for a maneuver back to level or horizontal from a climb, descent or a turn. The procedure is just the reverse, of course, for the turns descending: yoke/rudder to get the plane into the turn (30° at the AI) and a descent pitch right after (descent pitch at the AI), and with the manifold-prop pitch-mixture -in fact the manifold pressure mostly- set to get the airspeed for a descent. Yoke/rudder back to neutral. And the plane is turning as it's descending too (the turn must be too a turn at the standard rate, and the airspeed is checked the desired one at the airspeed indicator). Some gross trim. And the radial reading, which is the same than for a climb turn, with just the appropriate adjustments. And the remarks are the same for when you should interrupt the turn before the climb and reciprocally, with back to level, horizontal, or both also the same (see just above)
The practice of those different instrument readings should get acquired, finally, through experience, as it might even get simplified to be adjusted to the needs of the night VFR flight
 Performing a Night VFR Navigation
A night VFR flight unfolds according to the same scheme than a day VFR flight (see our tutorial to come 'The Steps of a Flight in a GA Plane') as a night navigation gets prepared just like a one for a daylight flight (see our tutorial to come 'To Navigate Aboard a GA Plane'). The only -and important- difference is that the visual marks to take along the course will be defined by their luminosity mainly -and identifiable with no mistake- as such marks in the landscape will have to be complemented with radionav aids (VORs, ADFs, etc., and/or the radials for those). In the absence of any visual landmarks, the pilot MUST, in any case, navigate through the use of the VORs, NDBs, etc. and/or the GPS. As far as the use of an on-board flight computer is concerned, the main remark is not -less still than for a daylight flight- to fly with the instruments only! To fly night VFR is still flying VFR. Hence, no instrument flight in VFR (or just get informed about the practice about that in your country)!
- to night VFR navigate may be performed only to/from night VFR rated terrains (that generally is pointed to on the terrain's map)
- night adaptation: a night VFR flight is sollicitating the nightly vision of the pilot. He thus has to get it prepared and maintained (the technique is usually to stay in a room with no light and then get to the plane without exposing oneself to some strong source of light; such a dim luminosity will be required in the plane's cabin too). As far as night VFR flying is concerned in FS2002, the best is to fly in the room which has been darkened (it's possible, on the other hand, to improve FS for the night flight, generally. see our tutorial to come 'How to Fly Better Still in FS2002?')
- note: just use, for you night VFR flights, the checklists from the tutorial to come 'The Steps of a Flight in a GA Plane'. Such checklists have, as options, the, night specific actions onto the plane's lights
- taxiing: you will note that you'll tend to taxi at a higher speed by night. Thus, think to maintain a correct speed! Most of the GA planes are fitted with taxiing lights, and the various lights of a plane modelized in FS, as, in the real life, using the landing light for taxiing may lead the light to overheat)
- flying an airport traffic pattern by night: there are no specific troubles about flying an airport traffic pattern by night. Just fly the procedures and coms just like for a daylight traffic pattern! see our tutorial to come 'The Standard Airport Traffic Pattern'. You'll note however that the traffic pattern, by night, has to be flown at an altitude of 200 ft in more, relatively to the daylight altitude. A traffic pattern by night is a fine view!
- take offs and landings: when you'll take off, just follow with most precision the runway central axis' markings! Just get aware of what is called the 'sumber night conditions' -the fact that there are few or no celestial, natural lights or that such a lighting is weakened by a cloud ceiling. Such conditions are dangerous, further more if they add to the absence of clearly identifiable, lighted areas in the vicinity. While taking off in such conditions JUST maintain a NEAT climb rate and wholy use the instruments to fly (speed, pitch)! For a landing, on the other hand, should there be no lights clues between your plane and the runway threshold -such conditions are called 'black hole conditions'- you'll have a clear tendency to fly too low, thus to crash before reaching the runway! In that case, don't rely on the visual clues only. Use the landing aids instead, like the VASI, PAPI, etc., or the ILS, or the GPS. Should one just get a DME at disposal, just make the approach on a 3 degree slope, and with a descent rate of 300 feet of descent for each statute mile. When one's not used with the terrain where one lands, an idea is to fly over it before landing. A default, when landing by night, is a tendency to fly too fast -hence with the risk of a 'hard' landing; JUST watch your landing speed. The flare, by the end of the final, will have to be assessed through the landing lights, when the landing lights are lighting the runway, and the weathering marks and the markings are clearly seen (for FS, you may use specific textures, or simulate, in part). If your plane doesn't feature landing lights, just begin to flare WHEN the lights, at the other end of the runway, seem to rise higher than the plane's nose!
- landing aids: the landing aids, like the VASIs or PAPIs -which help to estimate the descent slope down to the runway- are helpful aids for a night landing. Such aids are a combination of red and white, light bars and they are seen in perspective on a side -or both- of the runway. Along the descent, you'll have to keep a good, balanced view of the red, and the white bars, telling you that you're on the correct slope
- about hypoxia: hypoxia is more present during a night flight than during a day one due to that it affectes more directly the vision. The use of additional oxygen, in a GA plane, during a night VFR flight, must begin at a lower altitude than by day -as soon as 5,000 ft above ground level (AGL)
 Miscellaneous Additional Data
- the renewal of your night VFR rating is automatically awarded each year, provided that the pilot performed 5 night takeoffs and landings during the 6 months preceding the renewal
- weather conditions for a night VFR flight: a night VFR flight is defined any flight performed between the end of the civilian twilight and the beginning of the civilian dawn (practically, that means since 30 minutes after sunset until 30 minutes before sunrise). The weather requisites for a night VFR are the following: visibility of 3 miles (5 km), to be able to fly 500 ft above and 1,000 ft below the clouds layer, or a 2,000 ft separation from any cloud, when flying at the clouds' level. The weather conditions at the terrains may be less (you'll have just to keep the sight of the terrain, and to have a visibility superior to 1 mile (1.6 km). A particular danger of the night VFR is that it's difficult to spot any weather change, bringing, for example, that it's easier than by day to find oneself into IFR conditions). Also, the weather briefing is pecularly important for a night VFR flight. As, during the flight, you'll watch, through the mean of halos and glows, any formation of low altitude clouds, near the surface, and of any fog
- special VFR (see at 'To Navigate Aboard a GA Plane') is allowed, by night, to the IFR rated pilots only
- fuel: the fuel rules for a night VFR flight are that you must embark the quantity of fuel sufficient for the flight, plus a reserve for 45 minutes of flight
- altitudes rules: the circular rule is the same than the one for the day VFR. Generally, one has to fly at 1,500 ft above the most elevated obstacle in a 5-mile (8-km) radius (with the altitude becoming 2,000 ft for the areas with the relief reaching above 5,000 ft, as an altitude of 2,000 ft may also be usefully used in the previous conditions. For a local flight, without any real navigation, you may fly at an altitude of 1,000 ft above the most elevated obstacle in a 5-mile (8-km) radius
- flight plan: filing a flight plan is mandatory for a night VFR flight (obviously due to the greater dangers, compared to a daytime flight). You'll have to file the flight plan 30 minute before your estimated time of departure from the parking. You'll be authorized to file your flight plan in flight, radioing it to the arrival terrain, 30 mn before sunset, if, for example, the 30 minute limit after sunset could be reached before you arrive there, thus obliging you to end your navigation under the regime of a night VFR. No flight plan is mandatory for the local flights (with no navigation) or the flights towards a terrain located in the same approach ATC area than the departure terrain. At the arrival, you'll have to 'close' your flight plan so not to trigger for no cause any emergency operations
 Night VFR Emergency Procedures
- to land in case of a failure of the landing lights: JUST begin the flare when the lights, at the other end of the runway, begin to look higher than the plane's nose
- engine failure during the cruise: the emergency procedures, as far as to secure the plane are concerned, are the same than for an engine failure during the cruise by day (see our tutorial to come 'VFR Miscellaneous: Radionav Aids, Emergencies, Advanced Pilotage'). The only difference is that you won't be able to choose a landing surface at all! Your altitude permitting, just head to a terrain (preferably a one with night lightings). If the engine failure occurs above a terrain you really know well, just head there and, further, you'll have to land on a unilluminated part of it. There -and the procedure is the same for a unknown terrain- you will have tuned the landing lights so that they begin to be helpful since a already important altitude, and JUST light the landing lights when reaching that altitude! Just land then like usual, with the slowest speed possible however! If your plane does not feature landing lights and if no visual clues is available, just keep the plane level until she touches down (don't put the plane is a slight pitch!). Evacuating the plane is performed just like for a daylight emergency landing
Website Manager: G. Guichard, site Lessons In Microsoft Flight
Simulator / Leçons de vol pour les Flight Simulator de Microsoft, http://flightlessons.6te.net.htm. Page Editor: G. Guichard. last edited: 5/27/2013. contact us at ggwebsites@outlook.com
 .home page .back Tutorials. GA Planes


