 .home page .back Tutorials. IFR
| Important! To Read! those tutorials about the night VFR and IFR ratings, and about flying the airliners are not as accurate and reliable than those dedicated to the VFR flights. It's because we really practised the VFR flights, as we didn't ever qualify for the night VFR and the IFR ratings nor any commercial license! Our tutorials about such flights are based on our VFR experience only, and augmented with data and readings taken from the Internet! People who would like to find in those the same level of accuracy and details than in our VFR tutorials, should better turn to further websites or source. People who are just looking for a honest level of realism might be satisfied already with the level of our tutorials about the night VFR, IFR flights, and the ones aboard an airliner |
note: the pecular format of this page is due to that it contains specifically formatted checklists. Your browser, thus, is unable to display this page in the same format than the other pages of this site
The IFR rating (specifically, the IFR rating for private pilots), constitutes, like we already told, the apex of the formation for a private pilot. The IFR rated pilot can fly by all weather, by using the aerial routes, the radio navaids, the air traffic control and the instrument approaches. When speaking English -for a pilot from a non-English speaking country- he will be allowed further for such experiences like long flights -the transatlantic ones included- and air raids, bringing him to faraway countries and regions! The IFR rating we're going to train for will include the rating for the GA twin-engine, thus bringing us further into our pilot's training, with both the IFR, and twin-engine ratings. A tough teaching ahead, but well the worth of it! While we'll have learn the IFR theoretically, we'll then focus on a training for the twin-engine rating, with the checklists for a Beechcraft Baron 58. Let's recall, for a sense of what's coming on, that, in the real life, the IFR rating needs 47 hours of theory, 30 hours of flight in a simulator, and 50 hours of flight (the twin-engine rating included)! People who would wish to pass their IFR rating aboard the same single-engine plane they used to get their landing gear and controllable-pitch propeller rating, will just have to use the first four paragraphs of that page only
|
. The IFR Pilotage . IFR Navigation . The Instrument Approach . The Waiting Patterns . The IFR Rating on A Twin-Engine Plane |
To pilot IFR, like the name, means controlling the plane through the mean of the flight instruments gauges only. The PPL you trained for, as far as it is concerned, just used visual clues, using the relationship between the horizon and the panel's top. To fly IFR, at the opposite consists into flying instruments, with no external reference that is as one controls the plane through the main flight instruments. We take a much, for the method of how instruments flying, from the Roy Machado's lessons. Thus, for more details on those points, you'll have to check more into there. You'll have had some overview of the instrument flying, should you have performed our training for the night VFR flight, getting thus some basis for our new training when you trained for the flight without visibility. For people who wouldn't have follow the classical curriculum, they will have to take the notions found into this tutorial, from scratch
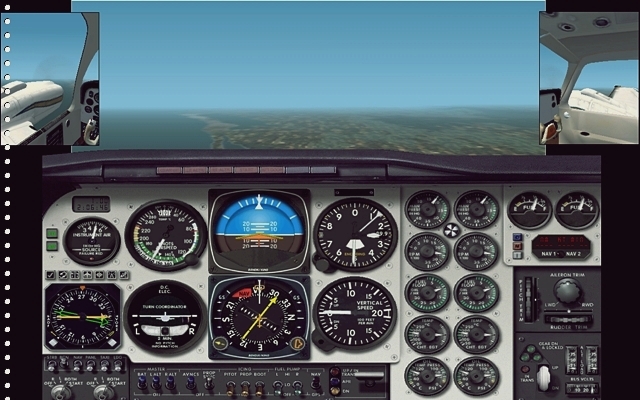 | click on the picture to a view of how to simulate a simulator into FS2002 |
Flying IFR -or instrument flying- means to trust the six main flight instruments of your plane: the airspeed indicator, the attitude indicator (or artificial horizon), the altimeter, the turn coordinator-indicator, the heading indicator, and the vertical speed indicator (VSI), that is. That's easy, in fact as you'll just have to integrate them into the basic procedures you mastered when you learned to fly a plane in its various attitudes and pitches. But, this time, instead that you place the plane in such or such pitch through a visual clue linking the horizon and the panel's top, to place the plane into a pitch and/or attitude is made through the flight instruments only! Easy! If you stay the closer to the reality during that training, and practice the hours of flight into a simulator, just simulate a simulator in FS! A good example is given in the illustration, with a basic idea being to use varied windows. The main point is to create a 'break into the reality' of FS, bringing a sense of artificial, and of a simulator!
|
- A First Base to Fly Instruments - The Method for Flying Instruments - The Pitches and Attitudes of A Flying Plane |
A First Base to Fly Instruments. A first good step into instrument flying is to fly level on a constant heading. Let's configure a twin-engine plane, like the Baron 58, with no advanced setting except the mixture and the propeller pitch. Let's place it into a level, constant-heading flight in the autopilot, at, say, about 8,000-8,500 ft. This exercise will help to spot where, on the attitude indicator, the marks are, which helps to correct any deviation of the plane on her longitudinal, or lateral axis -any tendency of the plane to turn on one side or another, or to leave a level flight, to climb or descent, that is. And that will be done with no external reference, but through the attitude indicator only. Those marks, in the Beechcraft Baron, are the white mark, at the indicator's top, on one hand, which points to how the plane is in a turn compared to the white lines of the indicator, as the orange triangle, in the middle of the indicator, marks the pitch to climb, or to descent, or a level flight of the plane. Now, just turn the autopilot off and turn right, then left, using the attitude indicator only and then back to a horizontal flight! Do those maneuvers trying not to loose, or gain much altitude! Turn the autopilot back on and let the plane stabilize back. Next, turn it off and have the plane climbing, or descending, and bring it back to level, through the attitude indicator only (try to control the plane in the way it doesn't tend to turn). Such exercises will allow you to well master those two automatisms: while flying level, on a constant heading, should the plane tending to start a left, or right turn, just act immediately on the yoke/AND rudder to bring the white, top mark to center, as, should the plane tend to climb, or descend, push, or pull the yoke to bring the orange triangle to the pitch of a level flight! Such a check of both the inclination and pitch of the plane and their respective correction MUST become a reflex for the pilot on a level IFR flight!
The Method for Flying Instruments. To fly with the instruments consists simply to apply a specific procedure: for each change of attitude of the plane, you'll have, in this order, to place the plane at that pitch, control that she stabilizes in it, fine-tune that stabilization into the pitch and, at last, if the maneuver lets you that time, you'll control the stabilization through a swift reading of the six main instruments
Well! Let's summarize somewhat! How does an IFR unfold? First, one will instrument take off (reading such degrees to climb, at the attitude indicator; takeoff checklist performed). The plane, then, is set into its climb to its cruise altitude through the IFR method, as just described above. Once the cruise altitude and regime reached, the plane is set into its level flight by this same method. Except any heading change and/or altitude change during the cruise, the plane, from then, is controlled through the control reading only, which you have to perform very regularly. The flight, from that, is, on another hand, performed along the IFR aerial routes, under the control of the Air Traffic Control centers
Let's now see in a more detailed way how the instruments reading are performed, into the flight, for each of the pitches and attitudes, considered that the steps of the procedure are the same for any of those! The plane, first is set into the attitude or pitch through the AI, with a first, quick tab setting. Then, the radial reading with the AI the major reference (moving for the AI to the one, or more gauges controling the move as any corrections is made through the AI only). Then a fine tab tuning, through the VSI. At last, time permitting, a control reading. You will take note that, in the following paragraphas, to make your training easier, just, for the turn maneuvers, bank your plane at 20 degrees instead of 30 as you will bank at 30 degrees once the 20-degree inclination mastered
 | The IFR readings for the climbs and descents (non-clickable picture) |
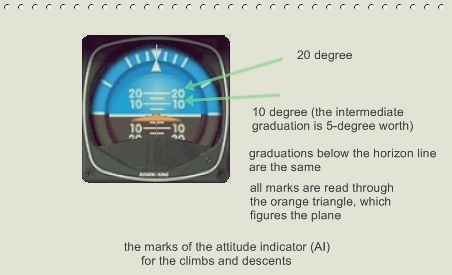 | click on the picture to a view of the accurate AI graduations for the climbs and descents |
 | The IFR readings for the return to level, from a climb or descent (non-clickable picture) |
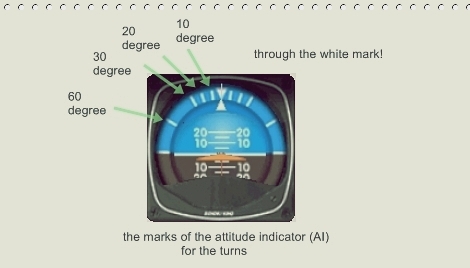 | click on the picture to a view of the accurate AI graduations for the turns |
 | The IFR readings for the turns (non-clickable picture) |
 | The IFR readings for the return to the horizontal flight, from a turn (non-clickable picture) |
 | The IFR readings for the climbing, or descending turn (non-clickable picture) |
The training for those radial reading should progressively become acquired, bringing you to the basics of the instrument flight!
Once mastering the instrument flight technique proper, you'll be able to pass to the next training step. The IFR navigation that is. The IFR navigation, like a VFR one, consists into flying from one terrain to another. The only difference being, obviously, that you're going to fly according to the IFR rules
|
- The Usual IFR Navigation - The Use of the Embarked Computers to Navigate IFR |
Using the Radio Navaids. The VORs and the NDBs are the radio navaids that the IFR pilots are using when they navigate. We'll describe them, in their use, as those lines will be either a useful theoretical reminder, or will be used to perform a classical IFR navigation
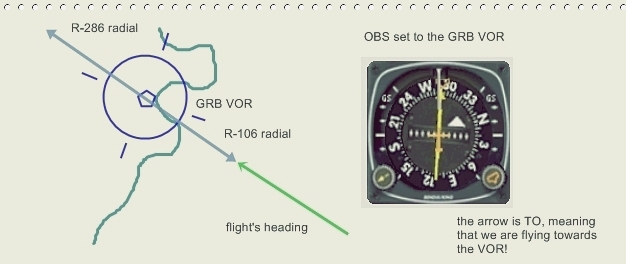 | click on the picture to a view of a VOR radial |
And with that, we'll continue with some additional remarks about the IFR conditions
. IFR rules: IFR flying is mandatory, whatever the weather conditions, above 18,000 ft in the USA (above the FL195 in France, or the FL245 in other countries). IFR flying is mandatory below those altitudes when the predominating ceiling and visibility is unsufficient pour fly VFR. IFR flying is performed by day or nighttime. The night IFR flights are an additional factor of stress as the pilot doesn't have at disposal any visual reference at all!
. flight altitudes (theoretical as it's the control which assigns an altitude to you; mostly used for the IFR flight plan): in the controlled airspace, the flight altitudes, for an IFR flight, must be, whatever the heading, a multiple of 1,000 ft, like 3,000, 4,000, 5,000 ft, etc. In the US, they are using a circular rule: IFR flight altitudes have to be in thousands of ft, with, from 0 to 179 the thousands to be odd, and from 180 to 359 to be even
. fuel: for a IFR flight, the pilot must embark the fuel needed to fly to the terrain of destination, plus from that terrain to the diverting terrain, plus a 45-minute reserve at the cruise regime
. how the IFR rating is renewed? The IFR rating is automatically renewed each year, if the pilot, during the 6 months previous to the renewal, has performed at least 6 hours of IFR flight (real flight, or on a simulator), of them at least 6 instrument approaches (idem)
. radio failures: the planes flying IFR are particularly sensitive to their radio communications and embarkes radios. If your radio would come to fail, you'll have to set 7600 on the transponder, by which the controller will understand that you have a radio failure. If the failure is just unilateral -you can receive, but not emit- you'll use the IDENT button of the transponder, giving a specific radar echo on the controller's radar, and meaning that you acknowledge. If the unilateral failure is in the other sens (you can emit and not receive), you'll 'comment' each step of your flight so that the controller may follow the plane's flight. In case of a radio failure, generally, you must consider to follow the flight like it was planned (and further when the transponder itself might have failed). If the weather conditions are VFR, you must land on the nearest appropriate terrain and to warn the controllers. If the weather conditions are resolutely IFR only, keep flying your route IFR, respect the minimum altitude defined on the charts (MEA), and land at your destination via an instrument approach. The controllers, generally, will know that a plane without radio, is flying in their airspace and they will organize the traffic function of that, by derouting them generally
. remarks about the night IFR: the night IFR is flying IFR by night. No rating is required beyond the usual IFR rating. By nighttime, in the aeronautical sense, one understands between the end of the civilian twilight and the beginning of the civilian dawn (practically: from 30 minutes after sunset to 30 minutes before sunrise). One has a tendency to taxi at a higher speed at night than by day. So, watch that point! Most of the modern aircraft are featuring taxi lights (as using the landing lights for taxi may be dangerous, with the lights, at a reduced speed, tending to overheat). Takeoffs and landings in IFR, at night: accurately follow the center runway markings; just get aware of what is called the 'sumber night conditions' -the fact that there are few or no celestial, natural lights or that such a lighting is weakened by a cloud ceiling. Such conditions are dangerous, further more if they add to the absence of clearly identifiable, lighted areas in the vicinity. While taking off in such conditions JUST maintain a NEAT climb rate and wholy use the instruments to fly (speed, pitch)! For a landing, on the other hand, should there be no lights clues between your plane and the runway threshold -such conditions are called 'black hole conditions'- you'll have a clear tendency to fly too low, thus to crash before reaching the runway! In that case, don't rely on the visual clues only. Use the landing aids instead, like the VASI, PAPI, etc., or the ILS, or the GPS. Should one just get a DME at disposal, just make the approach on a 3 degree slope, and with a descent rate of 300 feet of descent for each statute mile (1.609 km). While landing by night, one may have too a tendency to fly to fast -with the risk of a 'tough' landing. Thus, watch your airspeed during the final! You'll assess further your flare with the landing lights, the runway marks and the weathering marks on it, as the flare is performed once the landing lights lighten the runway and that the markings and weathering marks are clearly seen! Should you not have any landing light, one begins to flare when the lights at the opposite side of the runway seem to get higher than the plane's nose. Hypoxia: the lack of oxygen is more present during a night IFR than during a daytime flight, as hypoxia fairly directly affects the vision. The use of additional oxygen, in a GA plane must begin at a lower altitude than by day -as soon as 5,000 ft above ground level (AGL)
. use of oxygen: the IFR pilot who doesn't use a plane featuring a pressurization of the cabin meets the same oxygen problems than a VFR pilot, with the lack of oxygen -or hypoxia- being felt beyond a certain altitude and even leading to unconsciousness. For a pilot, the limit is at 12,500 ft. From there to 14,000 ft, the pilot -and crew- must inhale oxygen during the total duration of flight, minus 30 minutes. Between 14,000 and 15,000 ft, the pilot and crew must inhale oxygen during the all duration of the flight. Beyond 15,000 ft, the passengers in turn must be fed with oxygen. In the GA planes, the oxygen supply, in the GA plane, is provided under the form of an oxygen bottle as the air is breathed through a light, oxygen mask
In the same way that the usual VFR navigations are considerably modified through the use of the onboard computers, the IFR navigation is also tending to change through those. The onboard computers, working with the GPS satellites and their databases are able to generate tn IFR route, to select the departing and arriving procedures and to display all those data in flight. Coupled with the autopilot they may too control the plane during the most of the flight. You'll note however that those computers can't control the landing nor some instrument approaches (the ones which are not GPS-homologated). The pilots have to fly those parts of the flight according to the usual IFR techniques. The embarked computers unluckily are badly managing the altitude of a flight as they work based on a 'GPS altitude', an altitude above the mean sea level. Any altitude reference during a flight using an onboard computer, will have to be done with the plane's altimeter, and not the computer! Such computers, on the other hand, are generally rack-featured, with the rack remaining in the plane and the computer extractible, allowing for a preparation of the flight in the pilot's lounge. for more about some characteristics of the onboard computer, check on the tutorial 'To Navigate Aboard a GA Plane'
To fly IFR needs that you always file a flight plan as the whole flight will unfold under the control of the air traffic control centers along your route. Once your IFR flight plan filed (on a formular, or through Internet, indicating the main data for your flight, on them the waypoints of your route), the pilot, at the parking, or once airborne (when taking off, for example, from a small, or uncontrolled terrain), will contact the first air traffic control authority taking him in charge. On the terrain which features ones, it's the clearance control as, if starting from a smaller or uncontrolled terrain, it will be the control which has you in charge, like, for example, the departures of an airport close to where you started, or a control center. Let's take for an example, a Beechcraft Baron 58, registered N334JK leaving from Moutain River, for a flight to Spokane: that will be like: 'Mountain River tower, Kilo-Juliet, good morning' / 'Kilo-Juliet, Moutain River tower, good morning' / 'Mountain River tower, November-3-3-4-Kilo-Juliet, Beechcraft Baron 58, leaving for a flight to Spokane, for instructions' / They will give you the active, the pressure, the instructions for the climb, etc. You'll take off and fly that. At a certain altitude and/or distance, the tower at Mountain River will transition you to the nearest superior air traffic control. Say an important airport, like Seattle: 'Kilo-Juliet, Moutain River tower, tune to Seattle departures on 1-1-6.7-5, good day' / 'Moutain River tower, Kilo-Juliet, Roger. Passing to Seattle departures, 1-1-6.7-5, goodbye' / Contacting them Seattle departures, which have competence to deliver to you your IFR clearance: 'Seattle departures, Kilo-Juliet, good morning' / 'Kilo-Juliet, Seattle departure, go ahead' / 'Seattle departures, November-3-3-4-Kilo-Juliet, Beechcraft Baron 58, on an IFR flight from Mountain River to Spokane, request IFR clearance as filed' / 'Kilot-Juliet, Seattle departures, you're cleared to Spokane as filed, through GULF, SALTY, V125, V234, V345, JIMO. Keep on your heading and climb to 12,000 ft. Squawk 0-8-7-4 and the QNH is 1-0-0-1' / 'Seattle departure, Roger. I'm clerared to Spokane as filed. GULF, SALTY, V125, V234, V345, JIMO. Keeping on my heading, squawking 0-8-7-4 and the QNH is 1-0-0-1' / the controllers are relatively benign concerning the flight altitude. Let's assume that, with 12,000 ft, you're just reaching the full middle of some consistent could ceiling, you'll negociate an altitude above, or below. FS2002 doesn't allow for those as, once an IFR altitude chosen, you're obliged to stick to that, fear that your IFR plan be cancelled) / Seattle departures will so vector you until GULF, your first waypoint, whence you'll fly you flight plan, as, once reached the border for their control, they'll pass you to the next air traffic control center: 'Kilo-Juliet, Seattle departures, you're reaching my limit; please contact Seattle Control Center on 122.65. Good day!' / 'Seattle departures, Kilo-Juliet, Roger. Contacting now Seattle Control Center, 122.65. Good day' / 'Seattle Control Center, Kilo-Juliet, good morning' / 'Kilo-Juliet, Seattle Control Center, good morning' / 'Seattle Control Center, November-3-3-4-Kilo-Juliet, Beechcraft Baron 58, now passing 9,000 ft, heading 0-7-6, to GULF' / 'Kilo-Juliet, Seattle Control Center, Roger, the QNH is 1-0-0-3' / you'll keep flying your route, passing at a moment to the Helena Control Center, whence you'll reach about Spokane. After having gotten the data for the approach, you'll perform that, descending and getting inserted into the Spokane airport environment. Should, further your arrival terrain be of a lesser importance, it might back be dependent on a larger terrain for the approach, for example, which would vector you to the final and passing you there to the tower
 | click on the picture to a view of the principles of a ILS approach |
The instrument landing systems come to complement the system of the IFR routes. As those routes allow to fly whatever the weather is, without any ground reference, the instrument approaches allow the IFR pilots to land by any weather, or almost so, bringing their planes down to the runway threshold. IFR approaches sort mostly into non-precision, and precision approaches. A non-precision approach is a one which does not feature any glide slope, with the pilot himself stepping down along the course according to the approach chart data. A precision approach is a one featuring a glide slope providing a plane with a automatic guidance along the course
Albeit the use today is to mostly regulate the planes, in the large airports environment, through the control with some planes delayed through some headings while some others are landing, any large airport approach environment features, at the limits of its airspace, 'waiting patterns'. Those patterns, under the form of hippodromes, are just flight circuits, attached to a VOR or a NDB, allowing to make one or more planes wait in altitude until they are allowed for the approach, or further into it. When several planes are concerned, they are just each at a different altitude, flying the same pattern one over each other. When the plane below is cleared further, the plane above descends one stage, and etc. Such waiting patterns today are often used for the missed approach procedures. To fly such a pattern first needs that you fly into it, first. The ways to do that vary according that the pattern is anchored to a VOR, or a NDB. The FS manuals may give good explanations for entering a pattern. The turns, once in the hippodrome, are performed at the standard rate, allowing for an accurate timing of flying the pattern
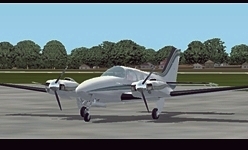 general view of a twin-engine (non-clickable illustration) |
Like we said, the IFR rating may be trained for on a single-engine, or a twin-engine plane. As we chose to train for the rating on a twin-engine plane, we'll now come to the last part of our training. Training to fly a twin-engine, thus allowing for more capabilities of flight. The Beechcraft Baron 58 is of the type used, or the Piper PA 32 Seneca, for example. The twin-engine planes, as they are featuring two engines, statistically have logically higher chances to endure some failures and they necessitate that the pilot masters the flight using one engine only. The reliability of the modern planes however mostly tends to render formal that part of the training. The twin-engine generally get propellers which can be 'feathered', a system of synchronization of the propellers, a crossfeed fuel system, an autopilot (as such a features really becomes worth on those planes) and miscellaneous other systems that the pilot must master theoretically, and all those new systems adding like additional actions into the checklists
|
- Theory - The Twin-Engine Aircraft Checklists and Procedures |
. Additional Data: here are the noticeable airspeed for a light twin-engine (the airspeed with SE -'single engine'- are designating the operations in case of a one-engine failure):
Like for the advanced GA planes we trained for in the previous tutorial, we are giving there the checklists and procedures for a twin-engine plane. Those are given for the Beechcraft Baron 58 airplane. A first, basical remark is that, much simply, a twin-engine needs, due to that it's featuring two engines, that all the engine controls are featured in double, of them the magnetos. The following checklists are in the FS2002 format. The twin-engine planes, except for the workload brought due to both the engines, are not fundamentally different from the advanced GA planes we're trained for now: manifold pressure, propeller pitch, landing gear. Some ops however are specific to those more advanced planes still, as they will be included in the checklists. The relative increase in the workload of the pilot may, like for the advanced GA planes authorize to print parts of the checklists to use them in flight, or to the use of mnemotechnical techniques. For the pilots using other planes than the Baron, or if you want Baron checklists still nearest to reality, you'll have to perform searches on the Internet to. Note: some actions in the checklists are listed are they are not modelized in FS; they are noted 'NFS.' For those checklists description, we'll assume that, like in the real life, when reaching that level of your rating, you already have gotten the advanced GA plane one, like described in the previous 'The IFR Rating (Retractable Landing Gear and Controllable-Picth Propeller Rating)' tutorial. Should some people want to accede to the level of a twin-engine immediately, as some terms of those descriptions remains obscure to you, check back the 'The IFR Rating (Retractable Landing Gear and Controllable-Picth Propeller Rating)' tutorial. General note: for all the pilots acceding now to this stage of the training, consider well that we're now entering in full in the IFR world. THUS, IFR automatisms first! You pilot with the instruments FIRST! To fly instrument, on the other hand, doesn't mean to fly with the head permanently into the panel. Even during the operations necessitating an important instrument work, like the departures, approaches, etc., one still has the time to check the outside -such an alternance, by the way, is easing your eyes adaptation too- and checking the outside, further, makes that one 're-equilibrates' the reference. Our checklists are given for daytime flights, as the specific actions on the lights, for a nighttime flight, are given like options
Like for the other training sessions, a good idea, for that training, is to save a flight by which your training plane will be set on your terrain at your favorite parking or hanger spot. Check the ' . The Steps of a Flight in a GA Plane' tutorial at 'Hanger, Parking, Preflight Check' for a reminder of the basics of that, which consists mainly into configuring your plane for parking according to the usual procedure followed by the end of a flight. Then save that flight for any future use
New plane, new panel, new commands! Just now procede with a general overview of the panel of the plane you'll use. A large gauge to the upper left (INST.AIR; the void pump indicator) checks that the static source system feeding some flight instruments of the plane is working (in case of malfunction, a red light would lighten). Nothing about the flight instruments except an advanced heading indicator (which is automatically tuned to the same value than the magnetic compass) and integrating too one of the VORs. The other VOR incorporates the NDB. The OBS for the main VOR is the knob at the bottom left as it's the large yellow arrow which marks the VOR radials on the gauge. The TO/FROM is the white arrow inside the gauge. Then, right, all the engines' gauges, in two columns, because of two engines: the manifold pressure, the r.p.m., the fuel flow, the engines' temperatures (double gauge), the oil temperature and pressure (idem). The trims for the three control surfaces (elevator, rudder, ailerons), advancing further into the capacities to trim the plane. To the lower left the double set of magnetos. Note that the actions of the left engine (the engine number 2) occurs before the ones of the right one (engine number 1) -like the engine start, for example. For the commands, they mostly are exerted through a jointed action on the both considered throttles or commands (gas, propeller pitch, mixture, etc.); as far as the reading of the engine instruments is concerned, they are performed by category, for the both engines (the left one, then the right one), like the manifold pressure left and right, the r.p.m. left and right, etc. The anti-ice systems are more elaborated too, with the pitot heat seen part of that system, and a command for the propeller blades (PROP) and for the pneumatic wings' leading edge de-icing (BOOT). The landing gear: red light while the operation is performed, three green lights when the train is lowered, and no light when it's retracted. The alternators' charge gauges, with a gauge for the bus voltage, at last. The cowl flaps are on the throttles panel (along with the fuel reservoir selectors). The feathering of the propeller is made by pulling the trottle(s) back into the red zone (FEATHER). As far as the pilotage is concerned, such a twin-engine doesn't need any co-pilot. At the pilot's will however, he may take onboard a co-pilot (really having his PPL, with a twin-engine rating), as this co-pilot will have for sole functions to perform the sky scanning for other traffics, the reading of the emergency checklists (or of the plane's handbook for some technical check), and he can also be entrusted with some transient pilotage of the plane, at the request of the pilot
A pre-flight check is used, like for the smaller planes, to check that the plane is fit to fly. Like for any other plane too, we have to have onboard the plane's documents (registration, navigability, maintenance, insurance certificates, etc.), the plane's handbook and our personal pilot's documentation (PPL, flight logbook). On those more advanced still planes, some external protections may have to be taken out (and stored; generally in the nose luggage compartment, where they are securized)
____________________________________
PRE-FLIGHT CHECKLIST

------
Interior Part of the Checklist
[ ] Static Source: NORMAL
[ ] Alternators: OFF
[ ] Pitot Heat: OFF
[ ] Pressurization, Pilot's Heat, Cabin Heat, Cabin De-Ice: OFF
[ ] Air Conditioning: OFF
[ ] Beacon: ON
[ ] Avionics Main Switch: ON OFF
[ ] Landing Gear: LEVER CHECKED DOWN
[ ] Flaps: FULL FLAPS
[ ] Trims (Elevator, Rudder, Ailerons): NEUTRAL
[ ] Cowl Flaps: FULLY OPEN
[ ] Landing Gear Emergency Crank: STORED
[ ] Battery: ON  (the following actions to be performed quickly to avoid weakening the battery)
[ ] Annunciator: TESTED
[ ] Landing Gear: CHECKED THREE GREEN
[ ] Flaps: 1 NOTCH
[ ] Fuel: QUANTITIES CHECKED
[ ] Beacon: OK
[ ] Landing Lights: CHECKED THEN OFF
[ ] Taxi Lights (in case of a night flight): CHECKED THEN OFF
[ ] Battery: OFF
------
External Part of the Checklist (all checks visually only, except otherwise stated)
[ ] Windshield: CLEAN
[ ] Pitot Tube: OK (take the cap off)
[ ] Static Source Left and Right: OK
[ ] Taxi Light: OK
[ ] Front Wheel (visually, general appearance and tyre with a correct pressure): OK
[ ] Front Wheel Leg: OK
[ ] Front Wheel Door: OK, UNOBSTRUCTED
[ ] Antenna 1: OK
[ ] Front Luggage Compartment: CONTENT SECURED, THEN CLOSED-LOCKED
[ ] Left Engine and Landing Gear: propeller's cone, blades' angle: UNHURT/left landing light: OK/cowl flaps: OK/left main landing gear (visually, general appearance and tyre with a correct pressure): OK, landing gear leg: OK, landing gear safety lock: OK, landing gear door: OK, general aspect: no leak
[ ] Left Engine Proper: possible air vent cap: OFF/oil level (through the doorlet): OK/oil cooler NFS: OK/ engine nacelle sump (sample): OK
[ ] Left Fuel Tanks: main left: open the cap then close it back: FUEL QUANTITY OK/ left auxiliary: IDEM/each tank sump: OK
[ ] Wing Leading Edge: OK
[ ] Stall Trigger: OK
[ ] wing's Edge Lights: OK
[ ] Ailerons and Trim Tab: OK
[ ] Flaps: OK
[ ] Horizontal Stabilizer Leading Edge: OK
[ ] Elevator (with Trim Tab): OK
[ ] Rudder (with Trim Tab): OK
[ ] Horizontal Stabilizer Leading Edge (Right): OK
[ ] Main Luggage Compartment: CONTENT SECURED THEN CLOSED-LOCKED
[ ] Step-In: OK
[ ] Right Flaps: OK
[ ] Right Ailerons and Trim Tab: OK
[ ] Right Wing's Edge Lights: OK
[ ] Right Wing Leading Edge: OK
[ ] Right Engine and Landing Gear: propeller's cone, blades' angle: UNHURT/right landing light: OK/cowl flaps: OK/right main landing gear (visually, general appearance and tyre with a correct pressure): OK, landing gear leg: OK, landing gear safety lock: OK, landing gear door: OK, general aspect: no leak
[ ] Right Engine Proper: possible air vent cap: OFF/oil level (through the doorlet): OK/oil cooler NFS: OK/ engine nacelle sump (sample): OK
[ ] Right Fuel Tanks: main right: open the cap then close it back: FUEL QUANTITY OK/ right auxiliary: IDEM/each tank sump: OK
[ ] Antenna 2: OK
[ ] General Aspect (one steps in front of the plane, in the axis, and check a general view): OK
The passengers (if any)' briefing may be enhanced with instructions about how to unlock the possible emergency exits and those emergency exit procedures. Otherwise, it's the usual procedures, leading to the engines' start. NOTE: 'engineS'. We have two engines now! Thus a lot of actions are to be performed unto two commands instead of one. On those planes, the pilot's seat and all the passengers seats are featured with a shoulder harness, a complement to the seatbelts during the takeoffs and landings. The harnesses, due to the higher speed, allow a greater safety in case of a shock. Note: on a twin-engine, the order of the actions on the engines est left first (engine number 2) and right then (engine number 3). The 'propeller area clear' procedure, which is a tradition of the aviation world, is to get ascertained that the propeller area is clear of any person. It's applied here to both the engines. The crosscheck of the alternators consists into, with the alternators' charge gauges to check that each alternator is charging. The synchronisation between the heading indicator and the compass is now automatically done. The void pump indicator is the 'INST.AIR' gauge, to the top left, indicating a good functionment of the air feed for the flight instruments working on that basis (any malfunction would be signaled by a red light). The pitot heat, as it's well seen a part of the anti-icing system, exists for each engine
____________________________________
ENGINE START CHECKLIST
(for that checklist, where, for the first time, the actions double necessitated by the two engine, those actions are noted: 'BOTH')

[ ] Pilot's Seatbelt: FASTENED
[ ] Embarking, Briefing the Passengers (if any), their seatbelts fastened: DONE
[ ] Main Door: CLOSED-LOCKED
[ ] Pilot's Seat: TUNED-LOCKED
[ ] Pilot's Seatbelt and Harness: FASTENED AND CHECKED FASTENED
[ ] Passengers' side Door(s): CLOSED-LOCKED
[ ] Passengers' (if any) Seats: TUNED-LOCKED
[ ] Passengers (if any)' Seatbelts and Harnesses: FASTENED AND CHECKED FASTENED
[ ] Ailerons Trim: NEUTRAL
[ ] Rudder Trim: NEUTRAL
[ ] Elevator Trim: NEUTRAL
[ ] Cowl Flaps: FULLY OPENED
[ ] Brakes: SET-LOCKED
[ ] Landing Gear: DOWN (THREE GREEN)
[ ] Flaps: NO FLAPS
[ ] Beacon: ON
[ ] Left Circuit Breakers: TESTED, IN
[ ] Avionics Main Switch: OFF
[ ] Right Circuit Breakers: TESTED, IN
[ ] Panel Lights (in case of a night flight): ON
[ ] Transponder: STANDBY (1200)
[ ] Fuel Reservoirs Switch (through the menu): ON
[ ] Fuel Reservoirs: BOTH FROM OFF TO ON
[ ] Mixture Throttles: BOTH FULL RICH
[ ] Propeller Pitch Throttles: BOTH FULL FORWARDS
[ ] Gas Throttles: BOTH 1/2" (1,25 CM) FORWARDS
[ ] Fuel Pumps: BOTH OFF
[ ] Battery: ON
[ ] Fuel: QUANTITIES OK
[ ] Navigation Lights (in case of a night flight): ON
[ ] Fuel Pumps: BOTH ON, PRESSURE INDICATOR STABILIZED, THEN OFF
[ ] Left Engine Propeller Area: CHECKED CLEAR
[ ] Left Magnetos: FROM OFF TO BOTH AND START
[ ] Left Gas Throttle: 1/2" FORWARDS
[ ] Left Alternator: ON
[ ] Left Oil Pressure: CORRECT WITHIN 30 SECONDS
[ ] THEN Idem for the Right Engine: right engine propeller area: checked clear, right magnetos: FROM OFF TO BOTH AND START, right gas throttle: 1/2" FORWARDS, left alternator: ON, left oil pressure: CORRECT WITHIN 30 SECONDS
[ ] Alternators Crosscheck: LEFT ALTERNATOR OFF AND RIGHT ALTERNATOR ON: CHECK THE CHARGE/LEFT ALTERNATOR ON: CHECK THE CHARGE
[ ] Bus Voltage: CORRECT (28 V)
[ ] Engine Instruments: FOR THE BOTH ENGINES (left+right for each category), CORRECT (both manifold pressure: irrelevant, both rpm: 1,200 through the gas throttles, both fuel flow: irrelevant, both engine temperatures: irrelevant, both oil temperatures and pressures: OK)
[ ] Annunciator: NO ALARMS
[ ] Void Pump Indicator: OK. NO RED LIGHT
[ ] Strobe: ON
[ ] Pressurization: ON
[ ] Pilot's Heat: AT WILL
[ ] Cabin's Heat: AT WILL
[ ] Cabin's De-Ice: AT WILL
[ ] Air Conditioning: ON (A/C)
[ ] Altimeter: SET
[ ] Avionics Main Switch: ON
[ ] Radios: TUNED
[ ] Radionav Aids (if any): TUNED
[ ] Autopilot (if any): TUNED
[ ] Onboard Computer (if any): TUNED
[ ] Anti-Icing System Settings (if any): SET (in any case, the pitot heat to ON)
[ ] Radioing (for taxiing): DONE
[ ] Transponder Code (if any): DISPLAYED
Once our clearances obtained, we are going to taxi to the active. The taxiing speed remains the same than those for the smaller planes -slightly adjusted to the size of the plane (about a bit more that a walking man). Any stop along the taxiways (and any stop, generally) brings to that one applies-locks the brakes, and sets the gas throttles to 1/2 inch forwards. Like for an advanced GA plane, one slightly leans the mixture for any taxiing. Don't forget to check, while taxiing, the turn indicator and coordinator, the heading indicator, and the brakes
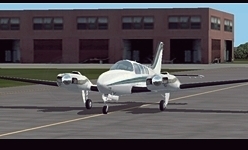 taxiing (non-clickable illustration) |
____________________________________
TAXI CHECKLIST
(caution: for the commands on the both engines, transitioning to omit the reference 'BOTH')

[ ] Taxi Lights (in case of a night flight): ON
[ ] Mixture: BOTH SLIGHTLY LEANED
[ ] Flaps: CHECKED NO FLAPS
[ ] Parking Brakes: UNLOCKED
[ ] apply the throttles and taxi
[ ] Turn Indicator: CHECKED WORKING
[ ] Heading Indicator: CHECKED WORKING
[ ] Parking Brakes: CHECKED WORKING
The before takeoff checklist, like usual, serves to prepare the plane for takeoff and check it's fit for. The most, imperative new, is that one points the plane's nose into the wind, and the front wheel must be aligned with the plane's axis (no runup with a plane ill-aligned!). The first part of this remark makes that one has to stop the plane not at the taxi end markings, but before instead. The linking between the magnetos, propellers pitch, etc. is specific. Another novelty: by the end of the checklist, the pilot enumerate to himself, at a low voice, possibly reading his notes, his briefing for the takeoff: 'We're going to take off on the runway ..., Vr is at ... kts, Vlof at ... kts The blue line [best climb rate with an engine out] is at ... kts. If any trouble occurs before takeoff, we'll abort the takeoff; if we have an engine failure or fire after takeoff but before retracting the landing gear, we'll land straight ahead; if the engine failure or the fire occur after the landing gear retractation, we'll continue the takeoff'. Once the checklist over, one moves towards the taxiway marking and one asks for the takeoff instructions
____________________________________
BEFORE TAKEOFF CHECKLIST
(the commands necessitating a consideration about double are not mentioned 'BOTH' anymore)

[ ] Pilot's Seatbelt and Harness: FASTENED
[ ] Main Door: CLOSED-LOCKED
[ ] Pilot's Seat: TUNED-LOCKED
[ ] Passengers' side Door(s): CLOSED-LOCKED
[ ] Passengers (if any)' Seats: TUNED-LOCKED
[ ] Passengers (if any)' Seats' Backs: IN THEIR UPMOST POSITION
[ ] Passengers (if any)' Seatbelts and Harnesses: FASTENED
[ ] Windows: ALL CLOSED-LOCKED
[ ] Ailerons Trim: NEUTRAL
[ ] Rudder Trim: NEUTRAL (or set for takeoff)
[ ] Elevator Trim: SET FOR TAKEOFF
[ ] Cowl Flaps: FULLY OPENED
[ ] Brakes: SET-LOCKED
[ ] Landing Gear: DOWN (THREE GREEN)
[ ] Flaps: NO FLAPS
[ ] Fuel Reservoirs Switch: CHECKED ON
[ ] Fuel Reservoirs: BOTH ON
[ ] Fuel: QUANTITIES OK
[ ] Battery: ON
[ ] Alternators: BOTH ON
[ ] Mixture: FULL RICH
[ ] Propeller Pitch: FULL FORWARDS
[ ] Testing the Magnetos: the rpm at 1,700 through the gas throttles; from BOTH to L (rpm loss), back to BOTH (back to rpm); from BOTH to R (rpm loss), back to BOTH (back to rpm)
[ ] Mixture: BACK TO SLIGHTLY LEANED
[ ] Bus Voltage: CORRECT (28 V)
[ ] Void Pump Indicator: OK. NO RED LIGHT
[ ] Engine Instruments: CORRECT (manifold pressure: irrelevant, rpm: 1,700 through the gas throttles, fuel flow: working, engine temperatures: correct, oil temperatures and pressures: OK)
[ ] First Propeller Test: the rpm at 2,200 through the gas throttles; one slightly pulls the propeller pitch throttle to get about 2,050 rpm; then back to full forwards (highest pitch)
[ ] Second Propeller Test: the rpm at 1,500 through the gas throttles; the propeller pitch throttle from full forwards to full backwards, and back, with a fall of the rpm (do not let go under 1,000 rpm)
[ ] Slow Regime Engine Test: GAS THROTTLES FULL OUT (the engine do not stop and the rpm don't fall below 625)
[ ] Gas Throttles: BACK TO 1/2" FORWARDS
[ ] Fuel Pumps: OFF
[ ] Flight Instruments: CHECKED (airspeed indicator: OK, attitude indicator: OK, altimeter: SET, turn coordinator-indicator: OK, heading indicator: OK, vertical speed indicator: OK
[ ] Annunciator: TESTED
[ ] Annunciator: NO ALARMS
[ ] Strobe: ON
[ ] Beacon: ON
[ ] Navigation Lights (in case of a night flight): ON
[ ] Taxi Lights (in case of a night flight): ON
[ ] Landing Lights (in any case): ON
[ ] Pressurization: ON
[ ] Pilot's Heat: AT WILL
[ ] Cabin's Heat: AT WILL
[ ] Cabin's De-Ice: AT WILL
[ ] Air Conditioning: ON (A/C)
[ ] All Flight Controls' Work: WORKING AND UNIMPEDED
[ ] Avionics Main Switch: ON
[ ] Radios: TUNED
[ ] Radionav Aids (if any): TUNED
[ ] Autopilot (if any): TUNED
[ ] Onboard Computer (if any): TUNED
[ ] Transponder Code (if any): DISPLAYED
[ ] Anti-Icing System Settings (if any): SET (in any case, the pitot heat to ON)
[ ] Flaps: SET FOR TAKEOFF AND VISUALLY CHECKED SO
[ ] Cowl Flaps: FULLY OPENED
[ ] Takeoff Pilot's Briefing: DONE
[ ] rolling until the taxi end markings
[ ] Radioing (for taxiing): DONE
When you're cleared to take off and that the final is checked cleare of any aircraft, just roll unto the runway for takeoff. Either one can take off 'rolling' -with, once the center of the runway reached, accelerating- or to make a stop at the runway's center (brakes back and 1/2 inch forwards. AND, while rolling, or at the stop, procede with those checks: doors: CLOSED-LOCKED, windows: ALL CLOSED-LOCKED; taxi lights (in case of a night flight): OFF, landing lights (in any case): ON, mixture: FULL RICH (as rolling, or rolling to stop, you'll have leaned the mixture back). And... taking off! Full throttles. During the takeoff romm, one checks that the r.p.m. are well on 2,625. A Beechcraft Baron 58 is taking off at about 85 kts (Vr) as it begins to fly at about 3 kts more (Vlof). At Vr, just gently pull the yoke to bring the nose of the plane to the climb pitch (at the attitude indicator; remember: you're flying instruments) AND the plane is taking off! No level, with the power of those planes becoming important. Once a positive climb rate reached and ascertained, one retracts the landing gear (red while retracting, no lights once retracted ANd you background-listen the gear retracting noise). Like we saw during our training aboard the advanced GA planes, apply, before retracting the landing gear some brakes strokes to stop the wheel from rolling. Then one takes the flaps off. The plane is progressively accelerating as we are proceding with the first engine settings to maintain 120 kts and 700 ft/mn. A good set seems to be 25 inches of manifold pressure and the propeller pitch to 2,400 rpm. AND the climb checklist: cowl flaps checked opened, one reads the engine instruments (all parameters normal) and one swiftly check visually, left and right, the condition of the nacelles and wings. And we keep climbing as, in a navigation flight, we'll have to manage further all what is radios with the various controls and flying the departing procedures, complicating the whole! The landing lights will be cut only when exiting the airport environment. If one chooses to fly with the autopilot, or onboard computer, all or part of the departing procedure, just set them now in. As far as we're climbing, now, just lean the mixture -starting at 3,000ft to maintain the engine performances (ideally, if no other choice, the best mixture regime is set 'by hear', retarding the mixture throttles until the engine stops, and then they just throttle the mixture back, of just enough to get the engine back. Just set the mixture by interval only as the climb unfolds
____________________________________
CLIMB CHECKLIST

[ ] Landing Gear: RETRACTED (no light)
[ ] Flaps: NO FLAPS
[ ] Rudder Trim (if used at takeoff): NEUTRAL
[ ] Engine Instruments: CORRECT (manifold pressure: 25, rpm: 2,400 through the gas throttles, fuel flow: working, engine temperatures: correct, oil temperatures and pressures: OK)
[ ] Cowl Flaps: FULLY OPENED
[ ] Wings (left, right): OK
[ ] Nacelles (left, right): OK
[ ] Pitot Heat: ON
[ ] Strobe: ON
[ ] Beacon: ON
[ ] Navigation Lights (in case of a night flight): ON
[ ] Anti-Icing System Settings (if any): SET (in any case, the pitot heat to ON)
[ ] Pressurization: ON
[ ] Pilot's Heat: AT WILL
[ ] Cabin's Heat: AT WILL
[ ] Cabin's De-Ice: AT WILL
[ ] Air Conditioning: ON (A/C)
[ ] Autopilot (if any): TUNED
[ ] Onboard Computer (if any): TUNED
Once our cruise altitude reached and the plane put into the level flight (at the attitude indicator, with the radial reading, etc.) and let accelerated, we'll configure the plane for the level flight, with a set of manifold pressure-propeller pitch-mixture. Such a set will be function either if one searches for some fuel efficiency, or speed efficiency. Like we saw it in the theoretical part of your training, the advanced pilots knows that the best mixture regime, in cruise, is set 'by hear', as they are retarding the mixture throttle until the engine stops, and then they just throttle the mixture back, of just enough to get the engine back. There's the best mixture regime for the cruise mode flight! No combination of gas, prop pitch and mixture may exceed 75 percent of the maximum power allowed for your plane. One ends the engines settings through the propellers synchronization (one can, first, like in the real world, fine-tune manually with the synchronization indicator, and then trigger the automatic prop sync). A pecular caution, for those twin-engine, GA, IFR planes, is to be brought to the icing conditions due to the altitudes at which they may fly. The routine of an IFR navigation then, consists into following one's route and flight plan, communicating with the air traffic control centers
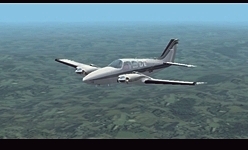 cruising (non-clickable illustration) |
____________________________________
CRUISE CHECKLIST

[ ] Cowl Flaps: CLOSED
[ ] Manifold-Propeller Pitch-Mixture: SET
[ ] Engines Intruments: OK
[ ] Alternators: CHECKED CHARGING (no crosscheck; visually simply)
[ ] Flight Instruments: OK
[ ] Strobe: OFF
[ ] Beacon: ON
[ ] Navigation Lights: (in case of a night flight): ON
[ ] Pitot Heat: OFF
[ ] Strobe: OFF (for the Cessna 182RG, you'll be obliged to take off the beacon too)
[ ] Anti-Icing System Settings (if any): SET (the pitot heat usually to OFF)
[ ] Pressurization: ON
[ ] Pilot's Heat: AT WILL
[ ] Cabin's Heat: AT WILL
[ ] Cabin's De-Ice: AT WILL
[ ] Air Conditioning: ON (A/C)
[ ] Autopilot (if any): TUNED
[ ] Onboard Computer (if any): TUNED
Like for any other nav, arrives the moment when you'll begin your descent to the arriving terrain, through the approach, transitioning there from the cruise, to the airport, environment. At last, at the appropriate location in those airport procedures, we'll configure the plane for landing. As far as the descent is concerned, there too, we'll have to check the icing conditions and, as far as the engines settings are concerned: less throttles (15 inches minimum however), the r.p.m. through the propellers pitch keeping at the value for the cruise, and the mixture according to the descent. Once on airport traffic pattern-equivalent attitudes, you'll be able to pass to an action through the manifold pressure only (the propellers pitch passed back to full forwards, and the mixture full rich). The airspeed for a Beechcraft Baron 58, in the traffic pattern or equivalent is about 130 kts, with the landing speed of 95 kts. Before the descent, the pilot will have to recap (at a low voice) the elements of the approach and landing (example (fictitious): 'We're landing at Spokane Rgal, LJOG, flying the GHIRD STAR. The MSA [Minimum Safe Altitude as indicated on the instrument approach chart] is of ... ft, the terrain is an altitude of ... ft; the arriving heading is ..., using the VOR SAU (frequency: ...) as the approaches frequency is ... For the landing, one lands using the ILS on the runway 1-6, frequency: ...; the FAF [Final Approach Fix] is at ... ft, the MDA (or DH) [Minimum Descent Altitude, or Decision Height -the altitude at which one has to get enough visibility to finish the landing] is at ... ft. The missed approach is on the R-212 of SAU, climbing to 10,000ft, with a right turn to the 356 heading, at 7 DME from SAU. Like weather conditions, we will have some moderate wind from our ten o'clock for the approach and landing, the sky will be clear and with a visibility of 9 miles'). One elements beginning to be important now is the missed approach procedure which, in case of troubles during the final (of it the visibility conditions not met at the MDA, or DH), brings us back to waypoints allowing for a second approach attempt. note: albeit less used than the instrument approach in those twin-engine planes, the traffic pattern may still be used, with some airport possibly having an altitude and/or distances for the larger planes, larger than for the single-engine planes
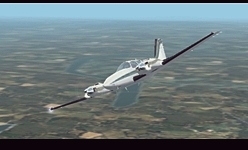 on the approach (non-clickable illustration) |
____________________________________
APPROACH CHECKLIST

. Approche Proper:
[ ] Radioing (approach, or the terrain, etc.): DONE
[ ] Altimeter: SET
[ ] Autopilot (if any): TUNED
[ ] Onboard Computer (if any): TUNED
[ ] Transponder Code (if any): DISPLAYED
[ ] Pilot's Seat: TUNED-LOCKED
[ ] Pilot's Seatbelt and Harness: FASTENED
[ ] Passengers (if any)' Seats: TUNED-LOCKED
[ ] Passengers (if any)' Seats' Backs: IN THEIR UPMOST POSITION
[ ] Passengers (if any)' Seatbelts and Harnesses: FASTENED
[ ] Briefing the Passengers (if any): DONE
[ ] Fuel Reservoirs Switch: CHECKED ON
[ ] Fuel Reservoirs: BOTH ON
[ ] Fuel: QUANTITIES OK
[ ] Cowl Flaps: CLOSED
[ ] Flight Instruments: OK
[ ] Engines Instruments: OK
[ ] Brakes: CHECKED
[ ] Anti-Icing System Settings (if any): SET (in any case, the pitot heat to ON)
[ ] Strobe: ON
[ ] Beacon: ON
[ ] Navigation Lights (in case of a night flight): ON
[ ] Pressurization: ON
[ ] Pilot's Heat: AT WILL
[ ] Cabin's Heat: AT WILL
[ ] Cabin's De-Ice: AT WILL
[ ] Air Conditioning: ON (A/C)
[ ] Approach Pilot's Briefing: DONE

. Configuring the Plane for Landing (to modulate function of what approach you are flying):
[ ] Airspeed: for about 130 kts
[ ] Flaps: 1 NOTCH
[ ] Mixture: FULL RICH
[ ] Propeller: FULL FORWARDS
[ ] Landing Gear: EXTENDED (THREE GREEN)
[ ] Brakes: CHECKED UNLOCKED
[ ] Fuel Reservoirs Switch: CHECKED ON
[ ] Fuel Reservoirs: BOTH ON
[ ] Cowl Flaps: CLOSED
[ ] Pitot Heat: ON
[ ] Strobe: ON
[ ] Beacon: ON
[ ] Navigation Lights (in case of a night flight): ON
[ ] Landing Lights: ON
[ ] Alternators: CHECKED CHARGING
[ ] Pilot's and Passengers (if any)' Seatbelts and Harnesses: CHECKED FASTENED
[ ] Autopilot (if any): TUNED or OFF
[ ] Onboard Computer (if any): OFF or TUNED
[ ] Radioing: LIKE NECESSITATED
[ ] Flaps: 2 NOTCHES
A Beechcraft Baron 58 is landing at an airspeed of 95 kts and full flaps. The plane is configured that way at the point where one begins the final (and, above all, the instrument approach). No specific remarks. As such twin-engine planes often are instrument landing, this part of the flight being thus facilitated, as, at the decision height, the landing conditions ascertained, ONE disengage the autopilot -or the onboard computer- AS, even on an instrument approach, one flies the last part of the final manually. Runway threshold, flare, full throttles out, AND... touchdown (main landing gear first, nose wheel then, progressively). One applies the brakes, progressively, until back to a controllable speed on the ground. One heads to the taxiway
____________________________________
FINAL AND LANDING CHECKLIST

[ ] Flaps: FULL FLAPS
[ ] Landing Gear: CHECKED EXTENDED (green)
[ ] Radioing
[ ] Briefing the Passengers (if any)
Once the runway cleared, and the markings passed, one configures the plane 'runway clear' and for taxi
____________________________________
RUNWAY CLEARED CHECKLIST

[ ] Cowling Flaps: FULLY OPEN
[ ] Flaps: RETRACTING ALL
[ ] Elevator Trim: SET TO NEUTRAL
[ ] Brakes: PULLED-LOCKED
[ ] Mixture: FULL RICH
[ ] Gas Throttle: 1/2" FORWARDS
[ ] Propeller Pitch: FULL FORWARDS
[ ] Anti-Icing System Settings (if any): SET (in any case, the pitot heat to OFF)
[ ] Strobe: ON
[ ] Beacon: ON
[ ] Navigation Lights (in case of a night flight): ON
[ ] Taxi Lights (in case of a night flight): ON
[ ] Landing Lights: OFF
[ ] Transponder (if any): SET TO 1200
[ ] Radioing (radio call on the terrain's frequency, or contacting the appropriate control)
[ ] Briefing the Passengers (if any): THEY MUST KEEP their seatbelts and harnessesfastened until the plane is immobilized
[ ] Pressurization: ON
[ ] Pilot's Heat: AT WILL
[ ] Cabin's Heat: AT WILL
[ ] Cabin's De-Ice: AT WILL
[ ] Air Conditioning: ON (A/C)
[ ] Mixture: SLIGHTLY LEANED before taxiing
Thus we're taxiing now to the parking the ground control instructed to us, and, there, we park the plane. Then we're going to cut the engine off and configure the plane for the parking. The main specificity for a twin-engine is that one performs a magnetos check just before the engines cutoff, called the 'grounding check', consisting into passing each magneto from BOTH to OFF, to hear briefly the engine stops, and then back from OFF to BOTH. Beginning with the left engine magnetos, then the right ones. Once the plane configured for parking, the passengers (if any) and the pilot may disembark. The pilot, then, performs an external checklist (which really is a checklist), checking rapidly that the landing gear -at its three points (main, nose) endure no damage at landing. Tires: OK, landing gear legs: OK, searching for possible leaks (no leaks). And a swift check of the whole plane, searching for any surface that might tend to get distant from the surface due to damaged fasteners (procede like for the pre-flight, walking around the plane, for that check). Then the various caps and protections will be placed back into place (engines air vents, pitot heat, etc.)
____________________________________
ENGINE CUTOFF AND PARKING CONFIGURATION CHECKLIST

[ ] Main Door: UNLOCKED
[ ] Pilot's Seatbelt: KEEPING IT FASTENED
[ ] Pilot's Harness: UNFASTENED
[ ] Passengers' side Door(s): UNLOCKED
[ ] Passengers (if any)' Seats' Backs : AT PASSENGERS WILL
[ ] Passengers (if any)' Seatbelts and Harnesses: passengers are allowed to unfasten their seatbelts and harnesses
[ ] Brakes: SET-LOCKED
[ ] Fuel Reservoirs Switch: CHECKED ON
[ ] Fuel Reservoirs: BOTH ON
[ ] Ailerons Trim: NEUTRAL
[ ] Rudder Trim: NEUTRAL
[ ] Elevator Trim: NEUTRAL
[ ] Cowl Flaps: CLOSED
[ ] Flaps: NONE
[ ] Landing Gear: LEVER DOWN (three green)
[ ] Gas Throttle: 1/2" FORWARDS
[ ] Mixture: FULL RICH
[ ] Propeller Pitch: FULL FORWARDS
[ ] Anti-Icing System Settings (if any): OFF
[ ] Pressurization: OFF
[ ] Pilot's Heat: OFF
[ ] Cabin's Heat: OFF
[ ] Cabin's De-Ice: OFF
[ ] Air Conditioning:  OFF
[ ] Radioing: LEAVING THE FREQUENCY
[ ] Radios: CUTTING THEM OFF
[ ] Autopilot (if any): OFF
[ ] Onboard Computer (if any): OFF
[ ] Avionics Main Switch: OFF
[ ] Throttles: FULL OUT
[ ] Magnetos Grounding Check: DONE
[ ] Throttles: BACK TO 1/2" FORWARDS
[ ] Mixture: FULL LEAN
[ ] Magnetos (once the propellers stopped): OFF
[ ] Strobe: OFF
[ ] Taxi Lights (in case of a night flight): OFF
[ ] Landing Lights: OFF
[ ] Navigation Lights (in case of a night flight): OFF
[ ] Alternators: OFF
[ ] Battery: OFF
[ ] Fuel Reservoirs: BOTH OFF
[ ] Fuel Reservoirs Switch: OFF (through the menu)
[ ] Beacon: OFF
------
External Checklist (which is a checklist strictly)
[ ] Tires: OK
[ ] Landing Gear Legs (three ones): OK
[ ] Possible Landing Gear Leaks (three ones): NO LEAK
[ ] Surfaces: ALL OK
[ ] Various Caps: REPLACED

supplementary actions to be performed outside the plane (not a checklist anymore, strictly): wheels' stops, fixing cables, etc.)
For a twin-engine, the go-around procedure is like: checking that the propellers' pitch is full forwards, AND full throttles back. The flaps are brought back to their takeoff vale (1 notch) and one lets the plane accelerate on a level flight, until the takeoff speed (85 kts). Taking then the pitch to climb. Once a positive climb rate ascertained, one retracts the landing gear. Then the flaps. One performs a check of the engines instruments. Cowl flaps: fully open and wings and nacelles checked
____________________________________
REJECTED LANDING CHECKLIST

[ ] Propellers Pitch: CHECKED FULL FORWARDS
[ ] Gas throttle: FULL FORWARDS
[ ] Flaps: SET for takeoff
[ ] Airspeed: 85 kts
[ ] Once a positive climb rate ascertained: LANDING GEAR RETRACT
[ ] Landing Gear: CHECKED RETRACTED (no light)
[ ] Flaps: ALL RETRACTED
[ ] Engine Instruments: CORRECT (manifold pressure: 25, rpm: 2,400 through the gas throttles, fuel flow: working, engine temperatures: correct, oil temperatures and pressures: OK)
[ ] Cowl Flaps: FULLY OPEN
[ ] Wings (left, right): OK
[ ] Nacelles (left, right): OK
As the twin-engine planes are advanced ones, and that they have two engines, they are more statistically prone -than the GA advanced planes still- to failures. The emergency procedures for their planes are known by the pilots, who train for them
. Engine Failures
. Engine Fires. Electrical Fires
. Landing Gear Troubles
. Miscellaneous
Well. You're now reaching the top for any private pilot training, being able to master those powerful, twin-engine planes and, for example, fly air raids. The next steps could be either some dedicated planes, or the commercial sector. Good flights!
Website Manager: G. Guichard, site Lessons In Microsoft Flight Simulator / Leçons de vol pour les Flight Simulator de Microsoft, http://flightlessons.6te.net.htm. Page Editor: G. Guichard. last edited: 5/27/2013. contact us at ggwebsites@outlook.com